Build a Fully-Onchain Image Gallery
The FlowtoBooth tutorial series teaches you how to build a fun benchmark app and provides inspiration for the greater scope of possibilities building on Flow thanks to gas being so much less expensive.
It is not a production best-practice. While everything in these tutorials works, you'll run into the following problems at production scale:
- RPC Providers will likely rate-limit you for reading this much data at once
- NFT marketplaces may not display the images, likely due to the above
- 256*256 images are huge by blockchain data standards, but too small for modern devices
If you search for resources on how to store images of any significant size onchain, you'll be told it's either prohibitively expensive or even completely impossible. The reason for this is two-fold - first the size limit for data on transactions is about 40kb. Second, saving 40kb takes almost all of the 30 million gas limit on most blockchains.
The former constraint is immutable (though many chains are slowly increasing this limit), which limits the app to images about 256*256 pixels in size. The latter is heavily dependent on which chain you choose.
At current gas prices on most chains, using all 30 million gas in a block costs several dollars - or potentially thousands on ETH mainnet. At current prices on Flow, spending 30 million gas costs less than a penny, usually 1 or 2 tenths of a cent.
Much more computation is available at prices you or your users will be willing to pay for regular interactions. Including, but not limited to:
- Airdropping hundreds of NFTs with one transaction, for pennies
- Generation of large mazes
- Generating large amounts of random numbers (with free native VRF)
- Extensive string manipulation onchain
- Simple game AI logic
In this tutorial, we'll build a smart contract that can store and retrieve images onchain. We'll also build a simple frontend to interact with the contract on Flow and another chain.
Objectives
After completing this guide, you'll be able to:
- Construct a composable onchain image gallery that can be used permissionlessly by onchain apps and other contracts to store and retrieve images
- Build an onchain app that can interact with this contract to save and display images
- Compare the price of spending 30 million gas on Flow with the price on other chains
Prerequisites
Next.js and Modern Frontend Development
This tutorial uses Next.js. You don't need to be an expert, but it's helpful to be comfortable with development using a current React framework. You'll be on your own to select and use a package manager, manage Node versions, and other frontend environment tasks.
Solidity
You don't need to be an expert, but you should be comfortable writing code in Solidity. You can use Hardhat, Foundry, or even Remix.
Build an Image Gallery Contract
Start a new smart contract project in the toolchain of your choice and install the OpenZeppelin contracts.
In your project, stub out a new contract for your image gallery that inherits from the Ownable contract:
_10// ImageGallery.sol_10_10// SPDX-License-Identifier: MIT_10pragma solidity ^0.8.28;_10_10import "@openzeppelin/contracts/access/Ownable.sol";_10_10contract ImageGallery is Ownable {_10 constructor(address _owner) Ownable(_owner) {}_10}
We're passing the original owner of the contract as an argument in the constructor to give greater flexibility for ownership when this contract is deployed.
Set Up Storage for Images
We'll store the images in a simple struct that holds the image as a base64 encoded stringand also contains a string for the description. Doing so allows the image to be directly used in html and makes it easier to test the contract directly with a block explorer, but has the downside of making the images 33% bigger. Another format would be more efficient.
These will be held in array:
_10struct Image {_10 string description;_10 string base64EncodedImage;_10}_10_10Image[] public images;
Construct Functions to Add and Delete Images
Next, add a function that accepts a _description and _base64EncodedImage and adds them to the array.
_10function addImage(_10 string memory _description,_10 string memory _base64EncodedImage_10) public onlyOwner {_10 images.push(Image(_description, _base64EncodedImage));_10}
Then, add one to delete the image at a given index:
_10function deleteImage(uint256 index) public onlyOwner {_10 if (index >= images.length) {_10 revert ImageIndexOutOfBounds(index, images.length);_10 }_10 for (uint256 i = index; i < images.length - 1; i++) {_10 images[i] = images[i + 1];_10 }_10 images.pop();_10}
If the array gets big enough that calling deleteImage takes more than 30 million gas, it will brick this function. A safer and more gas-efficient method is to use a mapping with a counter as the index, and handling for the case where an index is empty.
We're doing it this way to provide a way to delete accidentally uploaded images without making things too complex.
Retrieval Functions
Finally, add functions to get one image, get all of the images, and get the number of images in the collection.
_14function getImages() public view returns (Image[] memory) {_14 return images;_14}_14_14function getImage(uint256 index) public view returns (Image memory) {_14 if (index >= images.length) {_14 revert ImageIndexOutOfBounds(index, images.length);_14 }_14 return images[index];_14}_14_14function getImageCount() public view returns (uint256) {_14 return images.length;_14}
Final Contract
After completing the above, you'll end up with a contract similar to:
_49// SPDX-License-Identifier: UNLICENSED_49pragma solidity ^0.8.28;_49_49import "@openzeppelin/contracts/access/Ownable.sol";_49_49contract ImageGallery is Ownable {_49 struct Image {_49 string description;_49 string base64EncodedImage;_49 }_49_49 Image[] public images;_49_49 error ImageIndexOutOfBounds(uint256 index, uint256 length);_49_49 constructor(address _owner) Ownable(_owner) {}_49_49 function addImage(_49 string memory _description,_49 string memory _base64EncodedImage_49 ) public onlyOwner {_49 images.push(Image(_description, _base64EncodedImage));_49 }_49_49 function deleteImage(uint256 index) public onlyOwner {_49 if (index >= images.length) {_49 revert ImageIndexOutOfBounds(index, images.length);_49 }_49 for (uint256 i = index; i < images.length - 1; i++) {_49 images[i] = images[i + 1];_49 }_49 images.pop();_49 }_49_49 function getImages() public view returns (Image[] memory) {_49 return images;_49 }_49_49 function getImage(uint256 index) public view returns (Image memory) {_49 if (index >= images.length) {_49 revert ImageIndexOutOfBounds(index, images.length);_49 }_49 return images[index];_49 }_49_49 function getImageCount() public view returns (uint256) {_49 return images.length;_49 }_49}
Create a Factory
The image gallery contract you've just constructed is intended to be a utility for other contracts and apps to use freely. You don't want just one gallery for everyone, you need to give the ability for any app or contract to create and deploy private galleries freely.
Build a factory to deploy image galleries:
_13pragma solidity ^0.8.28;_13_13import "@openzeppelin/contracts/access/Ownable.sol";_13import "./ImageGallery.sol";_13_13contract ImageGalleryFactory {_13 event ImageGalleryCreated(address indexed owner, address gallery);_13_13 function createImageGallery(address _owner) public {_13 ImageGallery gallery = new ImageGallery(_owner);_13 emit ImageGalleryCreated(_owner, address(gallery));_13 }_13}
Tracking Factories
Some app designs may need multiple galleries for each user. For example, you might want to be able to give users the ability to collect images in separate galleries for separate topics, dates, or events, similar to how many photo apps work on smartphones.
To facilitate this feature, update your contract to keep track of which galleries have been created by which users. You'll end up with:
_23// SPDX-License-Identifier: UNLICENSED_23pragma solidity ^0.8.28;_23_23import "@openzeppelin/contracts/access/Ownable.sol";_23import "./ImageGallery.sol";_23_23contract ImageGalleryFactory {_23 event ImageGalleryCreated(address indexed owner, address gallery);_23_23 mapping(address => address[]) userToGalleries;_23_23 function createImageGallery(address _owner) public {_23 ImageGallery gallery = new ImageGallery(_owner);_23 emit ImageGalleryCreated(_owner, address(gallery));_23 userToGalleries[_owner].push(address(gallery));_23 }_23_23 function getGalleries(_23 address _owner_23 ) public view returns (address[] memory) {_23 return userToGalleries[_owner];_23 }_23}
Testing the Factory
Write appropriate unit tests, then deploy and verify the factory on Flow Testnet.
If you need help, check out:
Navigate to evm-testnet.flowscan.io, search for your contract, and navigate to the contracts tab, then Read/Write contract. You'll see something similar to:
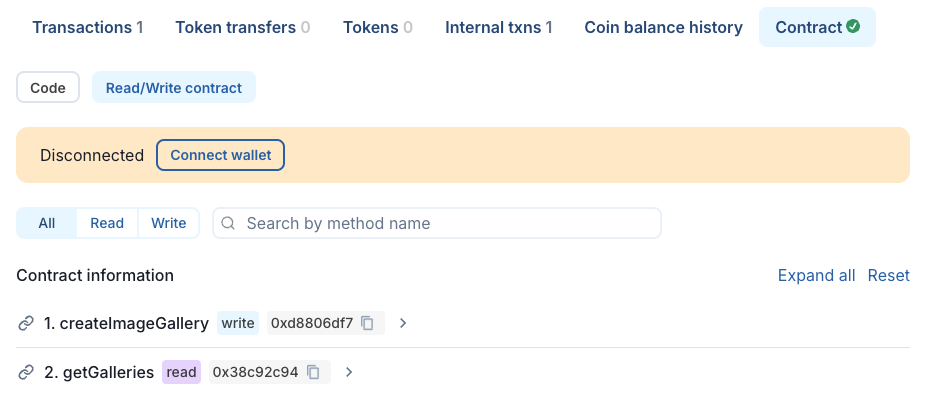
Connect your wallet. Use the Flow Wallet if you want automatically sponsored gas on both mainnet and testnet, or use the Flow Faucet to grab some testnet funds if you prefer to use another wallet.
Expand the createImageGallery function, click the self button, and then Write the function.
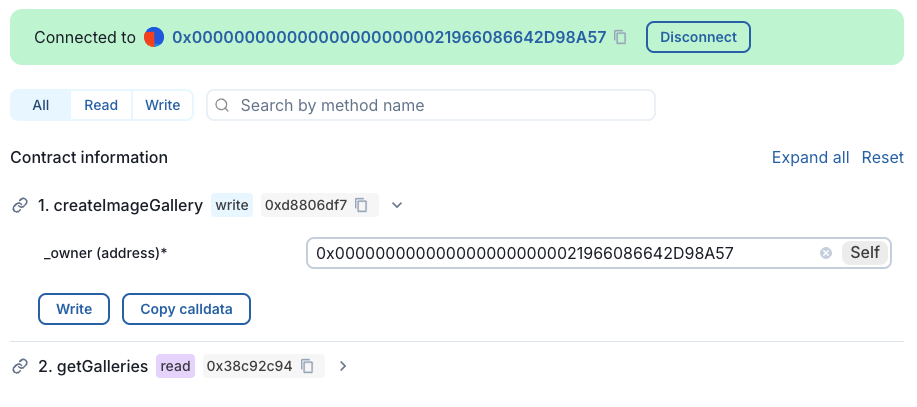
Approve the transaction and wait for it to complete. Then, call getGalleries for your address to find the address of the gallery you've created.
Testing the Image Gallery
Search for the address of your image gallery contract. It won't be verified, but if you're using our exact contract, you will see a message from Flowscan that a verified contract with the same bytecode was found in the Blockscout DB. Click the provided link to complete the verification process.
The easiest way to get an ABI for the image gallery is to deploy one. You can do that now if you like.
If you're following along, but used your own contract, simply deploy and verify one copy of the contract directly, refresh the page, then complete the above.
You could test addImage with a random string, but it's better to use a base64-encoded image. Search for and navigate to one of the many online tools that will base64 encode images.
Most sites of this nature are free tools created by helpful programmers and are funded with ads, donations, or the generosity of the creator. But you never know who made them or what they're caching.
Never upload or convert sensitive data on a free site.
Use the tool to convert an image that is ~30kb or smaller. Copy the string and paste it into the field in addImage. You can also add a description, but the bytes used will count towards the ~40kb limit.
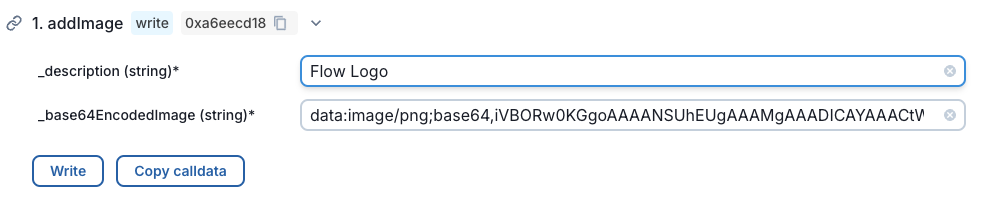
Click Write and approve the transaction. Take note of the cost! You've saved an image onchain forever for just a little bit of gas!
Once the transaction goes through, call getImage with 0 as the index to retrieve your description and base64-encoded image.
Paste your image string as the src for an img tag in an html snippet to confirm it worked.
_10<div>_10 <img_10 src="data:image/png;base64,iVBORw0KGgoAAAANSUhEUgAAAMgAAADICAYAAACtWK6eAAAbbklEQVR4nOzdCVhU1/038O+djWHHdRhREEEYIMEl4gYqccEYURFt3sQY16Q11aQx1Uhi0jatjfpq0sbUmiYx0ZhF2wiI0bhEY8Q9WAUVEURQIYIryg4zc//PTKQKzMAs995zZ+Z8nsenT4eZe34Bvpy7nEUCiqLMogGhqDbQgFBUG2SkC3BZkf4SJPX1hF6vBAMlWCgBVgkwLMDWAUwtGKYOUqYOy3ZVky7XVTGkC3A6SX1VgD4EA4MDoPYJANgARAYEIKyLCmD9ADT98wUgtfCojQAqHvxj7iDrShlKbpcCTCkKrpci91oJIClA+um7PP8XuhQaEHuM6CXB4NAhiA+Jw+BeQwAY/nUlXFURwBzF9uyjOFeeie3ZOcgtZwnX5LBoQCzVzVeKmKBHkBwXA31lPyT16QewfQB4kC6tHbfAMKeRln0K0k6nsPWH49iWXUi6KEdBA9KelISBWPrkNGgbf2WICelyOJKPgptfIvX0l1ixm4alDTQgLcUEdcHIsFGYOeoJqKUJANSkS+LZBRRo92DDzl3Yn78feeV1pAsSExqQJikJsViS8CrAJgJQkC6HkFrklW9ExpnVWE57Frh0QLp3AQZ0i8KC8VPwWIepAB4lXZKIsJB4ZyLtyFZsy01DWtZV0gWR4poBSUnoj5SE1WDZx0mX4gAawTD/waxNbyI9u4h0MUJznYAMCvLB/Phk9O8+CwF+I0iX44DqkFe+Ez8UbMAXx3cgt0xPuiAhOH9AwlUSvDtlJmKDV4jgGYWzKEL6mRcw+/N9pAvhm/MGZFCwN+YPfwaToudDr48mXY4T0kMqPYC1Bz7ApqxtyP3ZKR9GOmdAvluYgMHdPgYQSLoUF3EGqw48h3d2ZJMuhGvOE5Du3YEZUUMwLWYpAnzHky7HBdUir/xLfH1+FdbsyCddDFecIyDDQhRYNXkdwlVzSJdCoQ6HC/+MRWmrkFeuJV2MvSwdTSpOkUHA6mdn4E9j0tHZK550OZSRDIEdR+HXY8cCDUUovleEezWka7KZ4/YgyX3VWD/9K4ClwRCzvPJ1SMlYgB/zHfK2sOP1IAG+Mqx9di4Wj/yaPv12AJ29YvD0Y9Pg55WPfXkON3zFsQISFyrHJ89uQWzP1wB4ky6HslgnDOgxDXEh7jhVcgA3qxzmlrDjBOSdpHF4b/IOdPaKJV0KZRMGgR3jMC5yOPy8spB58Qbpgiwh/muQyEhg5YjFiOu13KECTbVFi+2lUzDj7xmkC2mPuH/hwlV++Gb6ejyifpWuwOJUJAj3mYykvu747twxVNY3ki7IHPH2IEvHh2FR/A9ONIuPMkUi/x6JH4xHZmED6VJMEedf5SUJY7Ao/nsaDhegbxyNjHn/xaRoUd6RFN8p1sbZ0zF3cNr9ZXEo19AVSX2mQqbcgcx8UV28iycgAb5y7PndUsT2XE0XtHNJnhgaNAsR6ktIzz5Lupgm4rkGObZoNcJVvyddBkWcDocvTUfius2kC4EoepBuvu7Y+/IahKsWiCqwFCkSBHZIRoR/BdJzjpMuhnxA9i5Yj3DV8zQc1EMYaFTjMCykCl9lHSVZCLmAGHqOPS+th8Z/BrEaKHEL7JiACFUN0nOOkCqBXED2vLQGGmPPQVHmafxHY1jvEnz10ykSzQsfkABfOfa+tAoaes1BWYRBYIdERPiXIj1H8JAI/wt69LW3oOnyZ8HbpRydFoeLxyJx7X4hGxW2B9k4Zzpig+hzDsoWEgT6TUWVNhM/FV8RqlHhepAlCWOQMmaPYO1RzqoEEz6MxqHCO0I0JsxYrKXjw5AyZr0gbVHOrju2z8tEcn9BVt3nPyDhKr/7o3J78N4W5SqisHjk34VoiN9rkMhIYOv09fBWDuW1Hcr1dPaKRFLfRuy+kol793hrht+AfDp1MaKMk50oimsMOnuOwr3KUzhceIGvRvgLyDtJ4zClz3rRzjmhnENcyFAU3NyC82VVfByen7tYcb3k2P7ieQAhvByfoprLwpB3ByOvTMf1gbkPSICvDN+8sAUaVTLnx6baZfiBhkj8ECrxQ0+JL4Ilvugh8UYHRglvRgEFJJAR6tQPaUvxch1Pz/nSc1Iwe9NKrg/L/QO75VNm03AIL17aHcmKMCTJQtFD6kO6HJOusdX8HTwp+k+4OGEr/rr9IpeH5TYgyX3VmBDxNqfHpEzygAzxsh6YKA/FRHkI1BIv0iWRpsSi4Tvw/ZlBOF5cwdVBuetrI4Pwy1q5Tr9tMlESMJguj8AFn7nY4TUFv3HrQ8PxQBg+eO4VLg/IXUCWPDmDLiTNH2/I8bKiP3K8Z2KT53h0l9CVV03q7fM7vPFMGFeH4yYgw0IUmNhrGSfHolp5VNIZJ7yn432PkYiSdiZdjtj5YXH/VGhUnFw+2B+Q7t2BVZM/pENJuOfHuGGd+2ic8pkBjbQT6XIcSRReT36BiwPZH5AZkUMQrprNRTHUA4ZeI897Dua59YWUPmu13sReKRgRaveDcPu/89Niltp9DOp/DBfhv1X0xQGv/weVxJN0OY4sECuSVtl7EPsC8t3CBAT40Q0zOfS2cijWeoxGR4k76VIcn0a1EG+Mt2sLcNsDMjDY+/5WyxQHPCHHP91H4w3lYNKlOJfpjy225+O2B2TB8GfoPuTced/9cbzo1td4ikVxSO39NJaO62nrx20LSLhKgonR821tlHpACgb/Xzkcc9zsOhOgzJNhyZiP0M3Xpr88tgVk9ZSZYPX0J8qBVxUDsFg5kPYbfNLpxuC5QTY9xLY+IIN6+iAueLktjVHNDZMG4A/uQ0iX4RpmDppny8esD8j8EckAVLY0Rj3QjfHCTq8p8GIUpEtxDWqfyVg6zt/aj1kfkP7dZ1n9GaqVf7iPouEQlhyJUVbPF7EuIClj+iPAb4S1jVDNJctCMVnRm3QZrkejmoGk6GBrPmJ5QLp3AVISVttSF/VAN8YT//IYS7oM17VgtFW7CVgekMfUUWDxuC01UQ8scotBZ/qUnJzH1E9Z83bLA/JS4hRb6qEe6MQoMdMtinQZri4SmxZafJlgRQ/SYaqtFVG/+KNyKDoytPcgLrHbW5a+1bKApCTEAhDlPtaOIpjxNU6PpURhJJKiwy15o2UBWZJAV0e0068U4VCIYEtIyojBpD6Jlryx/YDEBHUBWIsORpk3UU7X0BOVmKAnLHlb+wEZGTYKAH2iZYcgxgdDZQGky6AeFuA7HHEh7S4g1n5AZo6yKGmUefPd+tLBiOKjwHsvtLuJbPsrP6ilCVxV5KoM1x8kaaHHtoaL+F57GYX6CtSwjUTquM3WEWnXrN7SeQDea+stbQckJSGGLgRnn16Mr3GNXBJ+1lfhvfosfFJ/BndRT6QGkeuNpOgQpOcUmntD26dYS598lo+qXMlAGZm/L4e1pQi99wnerc+i4WjL5P7D2vqy+YB085VC2/grPmpyJVEE1rPa3ViExKpU1EIreNsOR+0V19aXzZ9ixQQ9YogJHzW5kp6MsKdXZ3U3kFidZrzuoCwQE2RjD5IcF8NHPa4mWCpsQP5Ye4SGwzqhWPqM2fNg8wHRV/bjqyJX0pMRbq+OHO11pGoLBGvPSUigvWV2/oH5gCRF04BwoJNUuMGJhgtyygavJ4wz9yXTARnRy/A6HVlnJy/IoeRhEy9z0ho53VzJdbDsE4hUmXyWazogg0OHGDcxouziwQgXjuv6GlSiQbD2nIwPeqtM7iliOiDxIW3e+qIs4yZg71HF0nDYJUqlMfWymR6kF12siQNCjr9iBWzLKfX2t6IHAWhAKFdjMiCtzwGS+qgAdBWiIkchBYOOjNK445PhtEnOSMBY0D/4QI59+iuC1HiDrUF/qXDr+eXqbqIOnO/bT05SdBhMbAPVOiAs6/IzeyIkHTFaFoi+UhX6SbviEVlnyG2YDXhSX44nJdt4qbElT8hwyXuOIG0ZRNz7FHn624K1JwCTv/etAzIo2OVm9mgkHfGkPBix0gDj4EK6g6xLUiG5nwKpp5rd7WgdELWPSwTEcNo0SR5qXKdqiIwOOaMgQ1gXQy9yvvmLrbBOHZCujAeeU0TiecWjdOdYqjmWjWgZkNZ3sSIDnDIghv/QBYq+yPeei9Xu8TQcVGvxmoiWL7XuQcI6O90drNGyIPxJORSxdOEEqi1DglotbG3qUW8HYaoRxlrlKPxWScddUhZg0Wr/EFMB8ROmGn71kXTBOo/RGEJ7DcpirGsEJF7aAxlek+FNN6ihrNNq4lTzi/RItcT4ANiBPS9/FHu8p9JwULbogu4dmg2RaB6QpL6eFq2VJVK/VwzAR55jbXrqTVHGbdpigpQPv9A8IHq9UuiKuPI7RX+s9oinKxhS9mFZ+cP/t8VzENYhAzJBFoJ3PWzaBpuiWmojIKzjBSRBFoRvvCZCasOGvRTVCss2u3ht/lvFwKECooQUH3kk0H03KO4wbfYgjMMsqOQOGTI8JyOI0Lq3lJNim0/ObNGDiG35bfPmK/pijLwn6TIoZ8Og2dL3LU7cGYcISFfGA68qB5Aug3JOzeaDOGRAPnUfC7XEi3QZlFNi2uhBZBLRB2ScLBjjFS4/K5jii4RpowdZ9l01ADLbD1noRQVd8JHiTT1STzfbTMXUw4MK4eqxTrSkM55QtBqyT1FcKWv5gkMF5H33kXScFcWnay1fMBWQO8LUYh2NpCPi5YGky6CcmyU9CCPKHmQC3Yif4hvDWNCDZF1plSIxmEgDQvFt29lW+0e0DkjJ7VKh6rGUH9wwlE6dpfiWW5rX8iUTk6MY0QVkkjwUEoIzPbJ115HaUICjup9RpL+Le2wD9Basp65mPHHU6ylBaizRV0FduU6QtnB/LWCnwzDnW77UOiAF10UXkGRFbyLtNkCHBdXf4+PGMzZ93gMy9JIIM8WfZYEytlqQtpxUI44WF7d8sXVAzl27KlRFlnCDFKPlQYK3m6Utw4yanTjvXAs0U+ZdxY/5rU4LWgeEkYhqo7sgiQ88mg/R510FW4dJ1Wn4mf5FdiGmf+9bX6Snn74LoEiIkiwRLPB8j0q2AY9XbqHhcDXpp/JNvWxmnipzhOdyLNZT4IB82ZCL0/obgrZJiQFjRUC2Zx/juxxL9WCE3avjw/psQdujROJkcYGpl00H5Fz5Qb7rsVRHiXDT5C/q7iCb9h6u6eq9Vrd40UYPcgbALb5rsoQ3I9wF+t7Gy4K1RYlKCU4Wm9xM0nRAcstZMMxpvquyhJArlhToRTlOk+IbI9mFkrsmn/yaX0wqLfsUnzVZypLdZLnSyPGurUKG25In+5QZy3fvNPcl8wGRdhJFQLQQbiUiFePJ6fH8Jdwery1ch9uF6CDvsdfcF80HZOt+UdzJqmGFmwHM9Q5UsQJuDlrDagVry8mcxrL1Vea+aD4g23IuATB5b1hIFWy9YG2NkPdAR4a7u2bPyiM5O1Z7hPw+OZX07ENtfbntBW0Lbn7JdT3WEnIAngQMpsk1nBxrmDQAj8q6cHIsS9CBija6VmlHQFJPEw9Ike6eoO296jaAk9sChuMIqUh3V9D2nMaJ4sy2vtx2QFbsLgRwgeuarFHMCvuDD5b6YbPHBOMoYlu9ouiPCQKv3SX098lJHEF6dnlbb2h/z4AC7R4uK7IWib+MTynC8RdlrE2ffVYegb95jBR8O4Zi2oNY71hDuzPM2v8pbti5i6t6bHEbdcYZfUJbrByILR4TEGLhYMlOjBLL3OKw3nMs77W1pIOeDrC03h0sXLO1vTe1H5D9+fsB1HJVlS1SG0yOI+OdoSc54z0bbyuHmr27ZTgVmyWPwjnv2VjqPhhuBLZ4PK69htuOszC/OOSV7Udeebu/1+3/NPPK65BXvhEa1TyuarNWamMB3na37ZTHXu6MDH9QDjX2KGe0N4xz0ivZBuPr3Rlv9JF2gZ+AAypNMXx/KCvty7fozMiyP3cZZ1ZDo/qNceQHAWf1N3FZf884u5AUd8gwUKbGwNZbaROlB4vNDa0W46DapkfWle2WvNGyK8nluwvBeLd5O4xv2xtENRNYNA5rS1HKmn0QTJki7fRVe3evmlh+q2XbkXYvaPiUoS0k2bxoZTTS74vVlm/5i6VvtTwg6blpJLdGOKgtQam+klTzomQ4vcpopD2rVSSKw1i+2+IhVJYHJC3rKhjmP7bWZa966PBWbZujAlzOfxouIJ/OYbFOWtYWa95u3dOsWZveBEDsfuLnjbk4rxPFREfiqtGI12p/JF2Go6nC2oM8BiQ9uwh5ZWYnl/BNBxaf1Nu2yqGzSa3PxxWWnnJa5VDh+/jpslVPna0fD/HDxc+s/gyHNjSexRW9sAMYxaYROvyt/iTpMhzNLXx2bLW1H7I+IF8cN/Qgl6z+HEdus3V4tnqHS08wXVF7Aqf0wg+/cWj51/+N1NNW731jfUByy/RIP/Nr400UQg7pSvF1Qy6p5onK1l7HsvqjpMtwNDpsPG7T0ve2DTmd/fk+SKQHbPosR1JqMwWdjisWr9X9iAZyf5sck0y2Af88aNPFq+1jstce+MDmz3LgKluJCVWpqBH3rtWcerM2E3u0dO0uK93CzI2v2/ph2wPyRdY2AERvKe3XXcW7tT+RLEEwGY0X8df646TLcDz5Nzci9bTNcwFsnzZ3oxKQKo4gtudMQOD9CR5yXHcNoRI/PCLtTKoE3p3V3cC06h24hwbSpTiaSizeNgt512yeTWbftLd3dmQjr5zovPUaaPF0zbfY1SiaHRs4VaSrQGzl1yihAxKtd7hwCdL+a9c5qf3zQr8+v4rk0/Ums2t24YhWdLvH2eVnfRWmVm+nPYctGK8TeC39X/Yexv61MY8X3MKwED0CO46y+1h2qEIjNjScwyCpGqHSDiRL4cRF3R0MqPoChawot60Xv5XfLkBajskV263BzcoCi9JWgfEifgWpB4unq7fj8/qzDv0g8YT2GsZWfYObLNGZzo5L0ikVm05kcHEoblZXvlmtBxqLEBcyg5Pj2aEeOqRrL6JG34gx8p6ky7HaF/W5GF+TijugKyXaqAyJfx+Bc9c4uf/P3fLjxfeKMDLUH529hF0xzYwjup+R2XgVMTI1ukg8SJfTrhv6Giys/QF/rD9MHwPaI+P8QqzZd4Krw3E7x3xEmATpLxjO+8I4Pa4dfKDA++4jMdPtETIT6i1wXHsNz1R/iyK6+Ju9jiH2vaHIvcbZGTa3G1hcvsXCz6sAA3pMI7XAQ0uGU65t2os4qL1q3NSf5MIPLV3SVeCV2v14uW4/PaWy32XM3TwGB/M5vR/O/Q4v+/IKEReiRGDHYZwf2w7F+nv4rOEsTmrLECsNgJ/EjVgtVWwDFtcewPTanXRPRK6s2PNbfHKI8y07+Pkrr/GX4pu53yPAL56X49tJCgbJ8t6YrojESFkgvBgF7202Qmc8ldrckIfPG86h0oXGkPEur3wjpn4yB6UVnF++8Xca9Ma4KCweedritbcI6QA3PK+IxnxlP15Ovyr0ddjQcBZrGv6LIhef6MUPJgdJH/fDjxd4ubfB73XC569MxISALQDILj1oAQkYhEk6GB80DpKp8ai0M3pKfKGWeFq8EPVNfY0xBHm6W8YxYid0ZcjR3TBeB1G8qMJbB+Lxjx28Ta/k/0L62OJlCO+6lPd2eOIJ+f/C4s94wJNRwI2RGk+ZalktyvU1KGErjUG4RdfHFZIeh4sTkbj2Oz4b4T8g3Xw9cP7tbdA3jua9Lcp1ZJWswJj3bZ7nYSn+N7H4+W4NEj8YD+Ac721RroHBAby0+S0hmhJml5fMwgbM2jQNAL2nSdmntCITg1cnIq9ckG19hdvp/kJ5OWTKHRgaNMu4xz5FWa8CC9NHI7NAsNUDhQuIQWb+DUSoL0GjmixY70U5ixKs/H4UPs4UdDFiYQMC4+qMZzEsNB+BHZLFMhyFEj0dVu5NxIo9gq+WJ3xADL7KOguNfwU0qnFE2qccyU2s3DsJK/YcJNE4mYAYbMs5jmGh1QjskECsBkr8Vu55Giv27ibVPLmAwNiTHEGEqgYa/zFE66DE6Nb9cFi0VRpfyAbEID3nCIb1LkFgh0R6TULdZ7jmmEiy52hCPiAGX/10ChH+JdCoxtO7Wy6v5P4FOZFrjpbE9Rf72wUjERuUYRwCRbmiCqzcNwwrdp0lXUgTcfQgTb46UYQqbSZG9h5jnC1LuY7SikzjQ0CBn3O0R1w9SJO4kA7YPi8TQBTpUigBMPgBg1dPQF55NelSWhJXD9Lkyp06FNxKQ3jXHujsFSnaIFP20iOrZCWmfDQHeeWinJQv/l+8o4vfgKbrX0mXQXGuCoeLn+J7Poe9xNmDPGz3lUzcqzyFuJChAPxIl0NxgcnBWweS8cqXorhT1Rbx9yBNkvupsX5aBgBRLExH2SivfANSts/law4518TfgzQ5X1aFbTmfootXDTSqOLEvBkG1chkr9szHm9vfwZlShwgHHKoHedjSCaFYNHwngN6kS6EscgxzN09G6sky0oVYy3F6kIdl5t/GgYJNGKipRye3vo6waoqLKkPG+VcxZ9N8rlc8FIpj9iAPe+OZMCzun0qfmYiMtFMqnnxnOg5ddOg9HBw/IAYalQyvJ7+Aib1SAASSLselSbxPYPnWFdh0YhtK7zrMtYY5zhGQJiNCpViRtAoa1ULSpbigShy+lILX0j5EbpnDB6OJcwWkyRvj+2D6Y4ug9n6a3u3i3S3jVssr9q6xd8NMMXLOgDRZOq4nloz5CDodnZDFPR1ksg3GTfrt2Idc7Jw7IDCu7MhgxuB4zBj4ItQ+SST3dHcSt5B/49/YeHwd/vnjGdLF8M35A/KwN8f5Y3zUSmhUxPdSdEBVOFT4Pj47vhqpp1xm613XCkiTpOhgLBg9A4+pnwIQSbocUZMoDiMt699Ye3Azfrp8nXQ5QnPNgDxs08IRSOz2FoCR9PvxP3pIO32J5VuWYfnufNLFkER/IZok9QnHpOhExAQ9gQDf4S64POod5JX/gH0XdiHrSgbSs8tJFyQGNCCmxIX44L3nn0dv2TznH+/FHMGx+nVYuGYr8sod+qk3H2hA2pMUHYrk/nHw94pDTNAwAKEOvPKKDkA20rMzca3yEE4UZ9Keom00INZaOk0N7c2xeD3hSbDsWAdYXKIEjGQXlu/+DvIee7BsvUMOGiSFBsQekSoGvVVhiPLXGP8XCENSnzCADQGgEvApfgOAUjBMAdKyCwDk4+TlfFy9ex4ni6+g5C5nG+u7GhoQviT3UyCsSwhYNgLxmggMCQoGC3+A9QegBtDFioeW9cah47/8uwZGUoaMMwXILc0DJOdxtKgYP+bTEPCABoSUwY8yUMuUYPXyX4LCKu4HhjVuqw6mwfi/EkkDUk+JcsUPiqJcnKPejaEoQdCAUFQb/i8AAP//vx9nTVDD9a4AAAAASUVORK5CYII="_10 />_10</div>
Building the Frontend
Now that your contracts are sorted and working, it's time to build an app to interact with it. We'll use Next.js for this, but the components we provide will be adaptable to other React frameworks.
Run:
_10npx create-next-app
We're using the default options.
Next, install rainbowkit, wagmi, and their related dependencies:
_10npm install @rainbow-me/rainbowkit wagmi viem@2.x @tanstack/react-query
Provider Setup
Add a file called providers inside the app folder. In it, add your config and providers for wagmi and rainbowkit. You'll need to add the Flow Wallet as a custom wallet. It's not included by default because it has special features that aren't compatible with other blockchains.
_115'use client';_115_115import { connectorsForWallets } from '@rainbow-me/rainbowkit';_115import { Wallet, getWalletConnectConnector } from '@rainbow-me/rainbowkit';_115import { QueryClient, QueryClientProvider } from '@tanstack/react-query';_115import { createConfig, WagmiProvider } from 'wagmi';_115import { RainbowKitProvider } from '@rainbow-me/rainbowkit';_115import { flowTestnet } from 'viem/chains';_115import { http } from 'wagmi';_115_115const projectId = '51407fcf066d74968d9a1a4c6da0d994'; // Replace with your actual project ID_115_115export interface MyWalletOptions {_115 projectId: string;_115}_115_115const flowWallet = ({ projectId }: MyWalletOptions): Wallet => ({_115 id: 'flow-wallet',_115 name: 'Flow Wallet',_115 rdns: 'com.flowfoundation.wallet',_115 iconUrl: 'https://lilico.app/logo_mobile.png',_115 iconBackground: '#41CC5D',_115 downloadUrls: {_115 android:_115 'https://play.google.com/store/apps/details?id=com.flowfoundation.wallet',_115 ios: 'https://apps.apple.com/ca/app/flow-wallet-nfts-and-crypto/id6478996750',_115 chrome:_115 'https://chromewebstore.google.com/detail/flow-wallet/hpclkefagolihohboafpheddmmgdffjm',_115 qrCode: 'https://link.lilico.app',_115 },_115 mobile: {_115 getUri: (uri: string) =>_115 `https://fcw-link.lilico.app/wc?uri=${encodeURIComponent(uri)}`,_115 },_115 qrCode: {_115 getUri: (uri: string) => uri,_115 instructions: {_115 learnMoreUrl: 'https://wallet.flow.com',_115 steps: [_115 {_115 description:_115 'We recommend putting Flow Wallet on your home screen for faster access to your wallet.',_115 step: 'install',_115 title: 'Open the Flow Wallet app',_115 },_115 {_115 description:_115 'You can find the scan button on home page, a connection prompt will appear for you to connect your wallet.',_115 step: 'scan',_115 title: 'Tap the scan button',_115 },_115 ],_115 },_115 },_115 extension: {_115 instructions: {_115 learnMoreUrl: 'https://wallet.flow.com',_115 steps: [_115 {_115 description:_115 'We recommend pinning Flow Wallet to your taskbar for quicker access to your wallet.',_115 step: 'install',_115 title: 'Install the Flow Wallet extension',_115 },_115 {_115 description:_115 'Be sure to back up your wallet using a secure method. Never share your secret phrase with anyone.',_115 step: 'create',_115 title: 'Create or Import a Wallet',_115 },_115 {_115 description:_115 'Once you set up your wallet, click below to refresh the browser and load up the extension.',_115 step: 'refresh',_115 title: 'Refresh your browser',_115 },_115 ],_115 },_115 },_115 createConnector: getWalletConnectConnector({ projectId }),_115});_115_115const connectors = connectorsForWallets(_115 [_115 {_115 groupName: 'Recommended',_115 wallets: [flowWallet],_115 },_115 ],_115 {_115 appName: 'Onchain Image Gallery',_115 projectId: projectId,_115 },_115);_115_115const wagmiConfig = createConfig({_115 connectors,_115 chains: [flowTestnet],_115 ssr: true,_115 transports: {_115 [flowTestnet.id]: http(),_115 },_115});_115_115export default function Providers({ children }: { children: React.ReactNode }) {_115 const queryClient = new QueryClient();_115_115 return (_115 <WagmiProvider config={wagmiConfig}>_115 <QueryClientProvider client={queryClient}>_115 <RainbowKitProvider>{children}</RainbowKitProvider>_115 </QueryClientProvider>_115 </WagmiProvider>_115 );_115}
Add the Connect Button
Open page.tsx and clear out the default content. Replace it with a message about what your app does and add the rainbowkit Connect button. Don't forget to import rainbowkit's css file and the ConnectButton component:
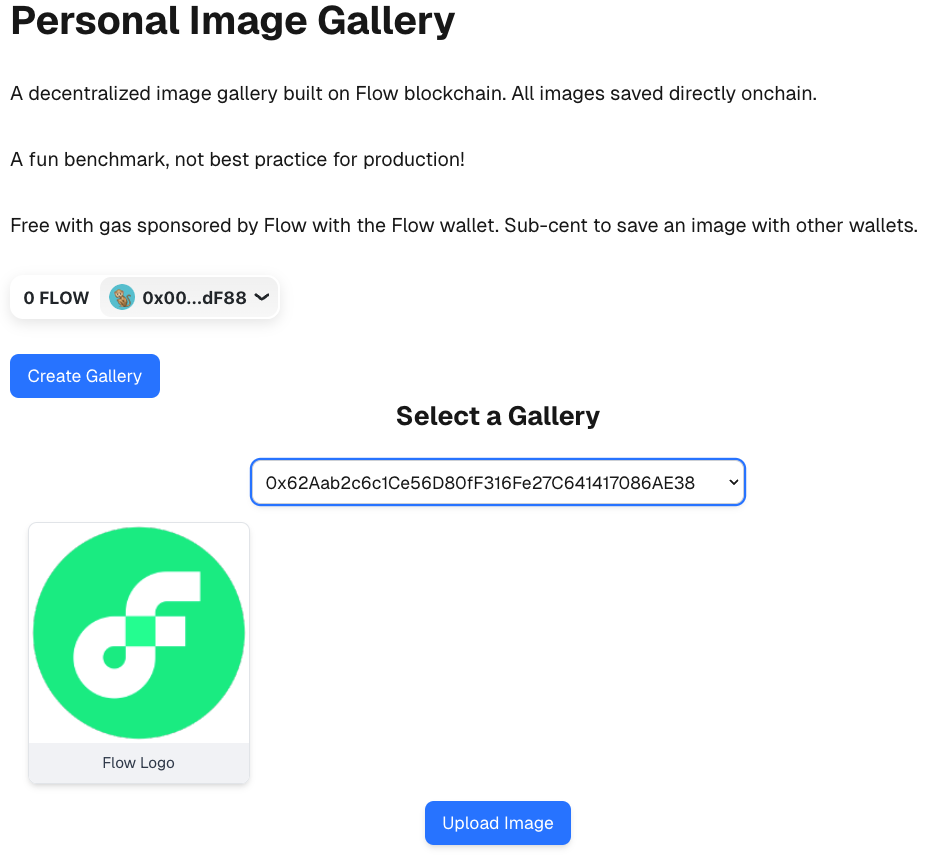
_25import '@rainbow-me/rainbowkit/styles.css';_25_25import { ConnectButton } from '@rainbow-me/rainbowkit';_25_25export default function Home() {_25 return (_25 <div className="grid grid-rows-[20px_1fr_20px] items-center justify-items-center min-h-screen p-8 pb-20 gap-16 sm:p-20 font-[family-name:var(--font-geist-sans)]">_25 <main className="flex flex-col gap-8 row-start-2 items-center sm:items-start">_25 <h1 className="text-4xl font-bold">Image Gallery</h1>_25 <p className="text-lg text-center sm:text-left">_25 A decentralized image gallery built on Flow blockchain. All images_25 saved directly onchain._25 </p>_25 <p className="text-lg text-center sm:text-left">_25 A fun benchmark, not best practice for production!_25 </p>_25 <p className="text-lg text-center sm:text-left">_25 Free with gas sponsored by Flow with the Flow wallet. Sub-cent to save_25 an image with other wallets._25 </p>_25 <ConnectButton />_25 </main>_25 </div>_25 );_25}
Test the app and make sure you can connect your wallet.
Import Your Contracts
Next, you'll need to get your contract ABI and address into your frontend. If you're using Hardhat, you can use the artifacts produced by the Ignition deployment process. If you're using Foundry or Remix, you can adapt this process to the format of artifacts produced by those toolchains.
If you didn't deploy the Image Gallery contract, do so now to generate an artifact containing the ABI.
Add a folder in app called contracts. Copy the following files from your smart contract project, located in the ignition and ignition/deployments/chain-545 folders:
deployed_addresses.jsonImageGallery#ImageGallery.jsonImageGalleryFactory#ImageGalleryFactory.json
Additionally, add a file called contracts.ts. In it, create a hook to provide the ABI and addresses of your contracts conveniently:
_22import { useMemo } from 'react';_22import { Abi } from 'viem';_22_22import imageGalleryFactory from './ImageGalleryFactory#ImageGalleryFactory.json';_22import imageGallery from './ImageGallery#ImageGallery.json';_22import addresses from './deployed_addresses.json';_22_22export default function useContracts() {_22 return useMemo(() => {_22 return {_22 imageGalleryFactory: {_22 address: addresses[_22 'ImageGalleryFactory#ImageGalleryFactory'_22 ] as `0x${string}`,_22 abi: imageGalleryFactory.abi as Abi,_22 },_22 imageGallery: {_22 abi: imageGallery.abi as Abi,_22 },_22 };_22 }, []);_22}
Note that we're not including an address for the imageGallery itself. We'll need to set this dynamically as users might have more than one gallery.
Add Content
You can use a few strategies to organize the components that interact with the blockchain. One is to create a centralized component that stores all of the state related to smart contracts and uses a single instance of useWriteContract. Doing so makes it easier to convey the transaction lifecycle to your users, at the cost of re-fetching all the data from your RPC provider after every transaction. This becomes sub-optimal if your app interacts with many contracts, or even different read functions within the same contract.
Add a folder in app called components, and create a file called Content.tsx. In it, add the following:
- Imports for React, wagmi, your contracts, and Tanstack
- State variables for:
- When a reload is needed
- When you are waiting on a transaction response
- The list of gallery addresses for the connected wallet
- Hooks for:
useAccount()useQueryClient()useContracts()useWriteContract()useWaitForTransactionReceipt()
useEffectsto:- Listen for a receipt and set
reloadto true andawaitingResponsefalse - Listen for needing a reload and invalidating the query for galleryAddresses
- Error handling
- Receipt of gallery addresses
- Listen for a receipt and set
- A
useReadContractto fetch the list of gallery addresses for this user - Frontend code to display the button to create a gallery if the user is signed in
You'll end up with something similar to:
_103'use client';_103_103import { useEffect, useState } from 'react';_103import {_103 useAccount,_103 useReadContract,_103 useWaitForTransactionReceipt,_103 useWriteContract,_103} from 'wagmi';_103import useContracts from '../contracts/contracts';_103import { useQueryClient } from '@tanstack/react-query';_103_103export default function Content() {_103 const [reload, setReload] = useState(false);_103 const [awaitingResponse, setAwaitingResponse] = useState(false);_103 const [galleryAddresses, setGalleryAddresses] = useState<string[]>([]);_103_103 const account = useAccount();_103 const queryClient = useQueryClient();_103 const { imageGalleryFactory } = useContracts();_103_103 const { data, writeContract, error: writeError } = useWriteContract();_103_103 const { data: receipt, error: receiptError } = useWaitForTransactionReceipt({_103 hash: data,_103 });_103_103 useEffect(() => {_103 if (receipt) {_103 setReload(true);_103 setAwaitingResponse(false);_103 }_103 }, [receipt]);_103_103 useEffect(() => {_103 if (reload) {_103 setReload(false);_103 queryClient.invalidateQueries({ queryKey: galleryAddressesQueryKey });_103 }_103 }, [reload]);_103_103 useEffect(() => {_103 if (writeError) {_103 console.error(writeError);_103 setAwaitingResponse(false);_103 }_103 }, [writeError]);_103_103 useEffect(() => {_103 if (receiptError) {_103 console.error(receiptError);_103 setAwaitingResponse(false);_103 }_103 }, [receiptError]);_103_103 const { data: galleryAddressesData, queryKey: galleryAddressesQueryKey } =_103 useReadContract({_103 abi: imageGalleryFactory.abi,_103 address: imageGalleryFactory.address,_103 functionName: 'getGalleries',_103 args: [account.address],_103 });_103_103 useEffect(() => {_103 if (galleryAddressesData) {_103 const newAddresses = galleryAddressesData as string[];_103 newAddresses.reverse();_103 setGalleryAddresses(newAddresses);_103 }_103 }, [galleryAddressesData]);_103_103 function handleCreateGallery() {_103 setAwaitingResponse(true);_103 writeContract({_103 abi: imageGalleryFactory.abi,_103 address: imageGalleryFactory.address,_103 functionName: 'createImageGallery',_103 args: [account.address],_103 });_103 }_103_103 return (_103 <div className="card gap-1">_103 {account.isConnected && (_103 <div>_103 <div className="mb-4">_103 <button_103 onClick={handleCreateGallery}_103 disabled={awaitingResponse}_103 className={`px-4 py-2 rounded-lg text-white ${_103 !awaitingResponse_103 ? 'bg-blue-500 hover:bg-blue-600'_103 : 'bg-gray-300 cursor-not-allowed'_103 }`}_103 >_103 {awaitingResponse ? 'Processing...' : 'Create Gallery'}_103 </button>_103 </div>_103 </div>_103 )}_103 </div>_103 );_103}
Don't forget to add your <Content /> component to page.tsx, below the <ConnectButton /> component.
Test the app and make sure you can complete the transaction to create a gallery.
Gallery List
Next, you'll need to display the list of a user's galleries and enable them to select which one they want to interact with. A dropdown list will serve this function well. Add a component called AddressList.tsx, and in it add:
_42import React, { useEffect, useState } from 'react';_42_42type AddressDropdownProps = {_42 addresses: string[]; // Array of EVM addresses_42 handleSetActiveAddress: Function;_42};_42_42const AddressDropdown: React.FC<AddressDropdownProps> = ({_42 addresses,_42 handleSetActiveAddress,_42}) => {_42 const [selectedAddress, setSelectedAddress] = useState('');_42_42 useEffect(() => {_42 if (selectedAddress) {_42 console.log(selectedAddress);_42 handleSetActiveAddress(selectedAddress);_42 }_42 }, [selectedAddress]);_42_42 return (_42 <div className="container mx-auto px-4">_42 <h1 className="text-2xl font-bold text-center mb-6">Select a Gallery</h1>_42 <div className="flex flex-col items-center space-y-4">_42 <select_42 value={selectedAddress}_42 onChange={(e) => setSelectedAddress(e.target.value)}_42 className="w-full max-w-md border border-gray-300 rounded-lg p-2 bg-white shadow-md focus:outline-none focus:ring-2 focus:ring-blue-500"_42 >_42 <option value="">Select an address</option>_42 {addresses.map((address, index) => (_42 <option key={index} value={address}>_42 {address}_42 </option>_42 ))}_42 </select>_42 </div>_42 </div>_42 );_42};_42_42export default AddressDropdown;
This component doesn't interact directly with the blockchain. It accepts the array of addresses and a function to handle setting the activeAddress.
To use it in Content.tsx, you'll need to add a new state variable for the activeAddress:
_10const [activeAddress, setActiveAddress] = useState<string | null>(null);
You'll also need a handler for when the activeAddress is set. You can't just use the setActiveAddress() function because you need to tell the app to reload if the user changes which gallery is active, so that the images in that gallery are loaded.
_10function handleSetActiveAddress(address: string) {_10 setReload(true);_10 setActiveAddress(address);_10}
Finally, add the new component under the <button>:
_10<AddressList_10 addresses={galleryAddresses}_10 handleSetActiveAddress={handleSetActiveAddress}_10/>
Test again, and confirm that the address of the gallery you created is in the dropdown and is selectable. The provided code contains a console log as well, to make it easier to copy the address in case you need to check it on Flowscan.
Display the Images
Next, you need to pull the images for the selected gallery from the contract.
Make sure you're using the same gallery you added an image too earlier. Otherwise, there won't be an image to pull and display!
Create a component called ImageGallery. All this needs to do is accept a list of images and descriptions and display them. You can style this nicely if you'd like, or use the basic implementation here:
_55export type ImageGalleryImage = {_55 description: string;_55 base64EncodedImage: string;_55};_55_55type ImageGalleryProps = {_55 images: ImageGalleryImage[]; // Array of image objects_55};_55_55const ImageGallery: React.FC<ImageGalleryProps> = ({ images }) => {_55 if (images.length === 0) {_55 return (_55 <div className="container mx-auto px-4">_55 <p className="text-center text-xl font-bold">No images to display</p>_55 </div>_55 );_55 }_55_55 return (_55 <div className="container mx-auto px-4">_55 <div className="grid grid-cols-2 md:grid-cols-3 lg:grid-cols-4 gap-4">_55 {images.map((image, index) => {_55 const isValidBase64Image =_55 typeof image.base64EncodedImage === 'string' &&_55 image.base64EncodedImage.startsWith('data:image/') &&_55 image.base64EncodedImage.includes('base64,');_55_55 return (_55 <div_55 key={index}_55 className="border border-gray-200 rounded-lg overflow-hidden shadow-md"_55 >_55 {isValidBase64Image ? (_55 <img_55 src={image.base64EncodedImage}_55 alt={image.description || `Image ${index + 1}`}_55 className="w-full h-auto object-cover"_55 />_55 ) : (_55 <div className="p-4 text-center text-red-500">_55 Invalid image data_55 </div>_55 )}_55 <div className="p-2 bg-gray-100 text-center text-sm text-gray-700">_55 {image.description || 'No description available'}_55 </div>_55 </div>_55 );_55 })}_55 </div>_55 </div>_55 );_55};_55_55export default ImageGallery;
Implementing the gallery display will take more additions to Content.tsx. You'll need to:
- Add a state variable for the list of images
- Implement a second
useContractReadhook to pull the images from the currently selected gallery address - Hook the gallery into the refresh logic
First, add the state variable to store the gallery array:
_10const [images, setImages] = useState<ImageGalleryImage[]>([]);
Next, add a useReadContract to read from the gallery. Use the activeAddress for the address property. Don't forget to destructure imageGallery from useContracts
_10const [images, setImages] = useState<ImageGalleryImage[]>([]);
_10const { data: galleryData, queryKey: galleryQueryKey } = useReadContract({_10 abi: imageGallery.abi,_10 address: activeAddress as `0x${string}`,_10 functionName: 'getImages',_10});
Hook the new query key into the refresh system:
_10useEffect(() => {_10 if (reload) {_10 setReload(false);_10 queryClient.invalidateQueries({ queryKey: galleryAddressesQueryKey });_10 // Added to existing `useEffect`_10 queryClient.invalidateQueries({ queryKey: galleryQueryKey });_10 }_10}, [reload]);
Then, add a useEffect to update the images in state when galleryData is received. Users expect the newest images to be shown first, so reverse the array before setting it to state.
_10useEffect(() => {_10 if (galleryData) {_10 const newImages = galleryData as ImageGalleryImage[];_10 // reverse the array so the latest images are shown first_10 newImages.reverse();_10 setImages(newImages);_10 }_10}, [galleryData]);
Finally, implement the gallery itself in the return:
_28return (_28 <div className="card gap-1">_28 {account.isConnected && (_28 <div>_28 <div className="mb-4">_28 <button_28 onClick={handleCreateGallery}_28 disabled={awaitingResponse}_28 className={`px-4 py-2 rounded-lg text-white ${_28 !awaitingResponse_28 ? 'bg-blue-500 hover:bg-blue-600'_28 : 'bg-gray-300 cursor-not-allowed'_28 }`}_28 >_28 {awaitingResponse ? 'Processing...' : 'Create Gallery'}_28 </button>_28 <AddressList_28 addresses={galleryAddresses}_28 handleSetActiveAddress={handleSetActiveAddress}_28 />_28 </div>_28 <div className="mb-4">_28 <ImageGallery images={images} />_28 </div>_28 </div>_28 )}_28 </div>_28);
Run the app, log in with your wallet that has the gallery you created for testing and select the gallery.
You're now displaying an image that is stored onchain forever!
Image Uploader
The last thing to do for this initial implementation is to add functionality so that users can upload their own images through the app and save them onchain without needing to do the base64 conversion on their own.
For now, we'll just generate an error if the file is too big, but later on we can do that for the user as well.
Add the ImageUploader component. This needs to handle uploading the image and displaying any errors. We'll keep the state for the image itself in Content so that it's accessible to other components:
_64import React, { useState } from 'react';_64_64type ImageUploaderProps = {_64 setUploadedBase64Image: (base64: string) => void; // Function to set the uploaded base64 image_64};_64_64const ImageUploader: React.FC<ImageUploaderProps> = ({_64 setUploadedBase64Image,_64}) => {_64 const [error, setError] = useState<string | null>(null);_64_64 const handleImageUpload = (event: React.ChangeEvent<HTMLInputElement>) => {_64 const file = event.target.files?.[0];_64_64 if (!file) {_64 setError('No file selected');_64 return;_64 }_64_64 if (!file.type.startsWith('image/')) {_64 setError('Only image files are allowed');_64 return;_64 }_64_64 if (file.size > 30 * 1024) {_64 setError('Image size must be 30KB or smaller');_64 return;_64 }_64_64 const reader = new FileReader();_64 reader.onload = () => {_64 const base64 = reader.result as string;_64 setUploadedBase64Image(base64);_64 setError(null);_64 };_64 reader.onerror = () => {_64 setError('Failed to read file');_64 };_64 reader.readAsDataURL(file);_64 };_64_64 return (_64 <div className="container mx-auto px-4">_64 <div className="flex flex-col items-center space-y-4">_64 <label_64 htmlFor="image-upload"_64 className="cursor-pointer bg-blue-500 text-white px-4 py-2 rounded-lg shadow-md hover:bg-blue-600"_64 >_64 Upload Image_64 </label>_64 <input_64 id="image-upload"_64 type="file"_64 accept="image/*"_64 onChange={handleImageUpload}_64 className="hidden"_64 />_64 {error && <p className="text-red-500 text-sm">{error}</p>}_64 </div>_64 </div>_64 );_64};_64_64export default ImageUploader;
As before, we'll need to make some updates to Content.tsx to complete the implementation.
First, add a state variable for the image:
_10const [uploadedBase64Image, setUploadedBase64Image] = useState<string>('');
Then add the ImageUploader to the return:
_10<ImageUploader setUploadedBase64Image={setUploadedBase64Image} />
Later on, you'll probably want to make a component for displaying the uploaded image, but for now just add it below the uploader button component:
_11{_11 uploadedBase64Image && (_11 <div className="mt-6 text-center">_11 <img_11 src={uploadedBase64Image}_11 alt="Uploaded"_11 className="max-w-xs mx-auto rounded-lg shadow-md"_11 />_11 </div>_11 );_11}
Finally, you need to add a button and a handler to call the smart contract function to save the image onchain.
_10function handleSaveOnchain() {_10 // console.log(uploadedBase64Image);_10 setAwaitingResponse(true);_10 writeContract({_10 abi: imageGallery.abi,_10 address: activeAddress as `0x${string}`,_10 functionName: 'addImage',_10 args: ['', uploadedBase64Image],_10 });_10}
Add the button inside the check for an uploadedBase64Image so that it only displays when there is an image to upload:
_22{_22 uploadedBase64Image && (_22 <div className="mt-6 text-center">_22 <img_22 src={uploadedBase64Image}_22 alt="Uploaded"_22 className="max-w-xs mx-auto rounded-lg shadow-md"_22 />_22 <button_22 onClick={handleSaveOnchain}_22 disabled={awaitingResponse}_22 className={`px-4 py-2 rounded-lg text-white ${_22 !awaitingResponse_22 ? 'bg-blue-500 hover:bg-blue-600'_22 : 'bg-gray-300 cursor-not-allowed'_22 }`}_22 >_22 {awaitingResponse ? 'Loading...' : 'Save Onchain'}_22 </button>_22 </div>_22 );_22}
Test the app to save your new image, and make sure the error displays if you try to upload an image that is too large.
Conclusion
In this tutorial, you built a fully functional onchain image gallery using Flow EVM. You created smart contracts that can store images directly on the blockchain and a modern React frontend that allows users to interact with these contracts. The implementation demonstrates how Flow's efficient gas pricing makes operations that would be prohibitively expensive on other chains not just possible, but practical.
Now that you have completed the tutorial, you should be able to:
- Construct a composable onchain image gallery that can be used permissionlessly by onchain apps and other contracts to store and retrieve images
- Build an onchain app that can interact with this contract to save and display images
- Compare the price of spending 30 million gas on Flow with the price on other chains
Now that you've completed this tutorial, you're ready to explore more complex onchain storage patterns and build applications that take advantage of Flow's unique capabilities for storing and processing larger amounts of data than traditionally possible on other chains.