Batched Tx From Scaffold
Ever since we launched Flow EVM, you can supercharge your EVM apps with Flow Cadence features and contracts. Some benefits, such as native VRF and inexpensive gas that won't compromise security, are built in and either easy to use or automatic. Others, such as the ability to use Cadence to structure and call EVM transactions, are powerful but complicated to configure and use. They also require developers to manage concurrent connections to both networks.
FLIP 316 improves the Flow Client Library (FCL) to support cross-VM functionality between Flow EVM and Flow Cadence.
For EVM developers, this means that you can use the familiar wagmi, viem, and RainbowKit stack you're used to, add FCL, and get features like multi-call write with one signature for users with a Cadence-compatible wallet.
In this tutorial, you'll learn how to create Click to Mint, a simple game that allows players to click a button to mint an ERC-20 token. With the power of Flow, they can also click a button and complete 10 separate transactions with just one approval!
The FCL functionality described in this tutorial is in alpha. Some steps may change. We'll keep the tutorial updated, but please create an issue or let us know on Discord if something doesn't ork for you.
Objectives
After you complete this guide, you'll be able to:
- Build an app that seamlessly integrates Flow Cadence and Flow EVM connections.
- Add Cadence features to your Rainbowkit/wagmi/viem app.
- Use Flow Client Library (FCL) to turn on multi-call contract writes to Flow EVM.
Prerequisites
Next.js and modern frontend development
This tutorial uses Next.js. You don't need to be an expert, but it's helpful to be comfortable with development with a current React framework. You'll be on your own to select and use a package manager, manage Node versions, and other frontend environment tasks. If you don't have your own preference, you can just follow along with us and use npm.
Solidity and Cadence smart contract development
Apps that use the hybrid approach can interact with both Cadence and Solidity smart contracts. You don't need to be an expert in either of these, but it's helpful to be familiar with how smart contracts work in at least one of these languages.
Onchain app frontends
We assume you're familiar with wagmi, viem, and RainbowKit. If you come from the Cadence, you might want to take a quick look at the getting started guides for these platforms. They're all excellent and will rapidly get you up to speed on how the EVM world commonly connects their apps to their contracts.
Get started
For this tutorial, we'll start from a fork of the FCL + RainbowKit + Wagmi Integration Demo that the team built.
Fork the repo so you can push your work freely to your own copy, then follow the setup instructions.
Project overview
Open the cross-vm app scaffold in your editor, run it, and view the site in your browser:
_10npm run dev
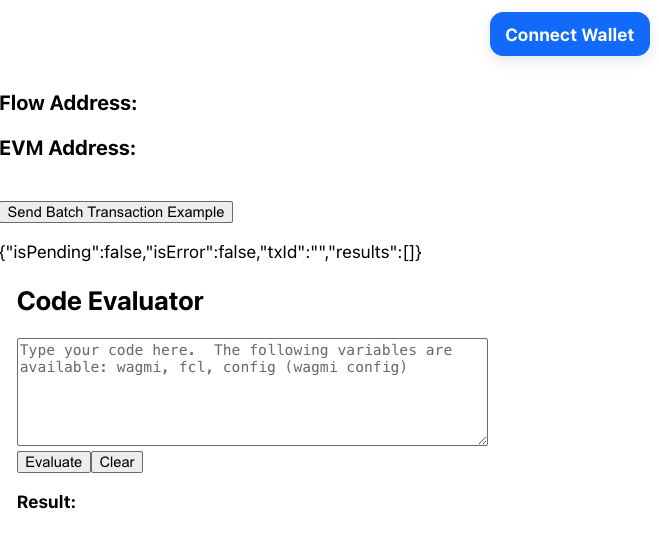
You'll see:
Connect with a Cadence-compatible wallet.
In a production app, you'll want to manage this process carefully. Non-Cadence EVM wallets may be able to connect, but they will not be able to use any Cadence features.
Send batch transactions
The first demo built into this scaffold is multi-call contract write.
On Flow, this isn't an unstable experimental feature - it's a demonstration of the power of EVM + Cadence.
Click Send Batch Transaction Example and approve the transaction. You'll see three lines appear on the page, similar to:
_10{"isPending":false,"isError":false,"txId":"b3c2b8c86e68177af04324152d45d9de9c2a118ff8f090476b3a07e0c9554912","results":[{"hash":"0x46e923a08d9008632e3782ea512c4c590d4650ba58b3e8b49628f58e6adddaa9","status":"passed","errorMessage":""},{"hash":"0x52c82dc689cd5909519f8a90d0a1ec2e74192d7603fd3b5d33f7f4d54a618a84","status":"passed","errorMessage":""}]}
Currently, the Flow wallet sponsors the fees for the compute units (equivalent of gas) for all transactions signed with the wallet on both testnet and mainnet!
Cadence parent transaction
The first line is the transaction ID of the Flow Cadence transaction that calls both of the EVM transactions. Search for it in Testnet Cadence Flowscan.
Cadence transactions are more complicated than those in Solidity contracts. Rather than being restricted to run functions present on the contract, they can run arbitrary code as long as the caller has access to all of the resources the transaction requires.
You can see the code of the transaction in the Script tab, but we've included it here for convenience:
_38import EVM from 0x8c5303eaa26202d6_38_38transaction(calls: [{String: AnyStruct}], mustPass: Bool) {_38_38 let coa: auth(EVM.Call) &EVM.CadenceOwnedAccount_38_38 // Borrow a reference to the EVM account that has the ability to sign transactions_38 prepare(signer: auth(BorrowValue) & Account) {_38 let storagePath = /storage/evm_38 self.coa = signer.storage.borrow<auth(EVM.Call) &EVM.CadenceOwnedAccount>(from: storagePath)_38 ?? panic("No CadenceOwnedAccount (COA) found at ".concat(storagePath.toString()))_38 }_38_38 // Iterate through the list of provided EVM transactions_38 execute {_38 for i, call in calls {_38 let to = call["to"] as! String_38 let data = call["data"] as! String_38 let gasLimit = call["gasLimit"] as! UInt64_38 let value = call["value"] as! UInt_38_38 let result = self.coa.call(_38 to: EVM.addressFromString(to),_38 data: data.decodeHex(),_38 gasLimit: gasLimit,_38 value: EVM.Balance(attoflow: value)_38 )_38_38 if mustPass {_38 assert(_38 result.status == EVM.Status.successful,_38 message: "Call index ".concat(i.toString()).concat(" to ").concat(to)_38 .concat(" with calldata ").concat(data).concat(" failed: ")_38 .concat(result.errorMessage)_38 )_38 }_38 }_38 }
In this case, it checks that the caller of the Cadence transaction has permission to control to the EVM account, which is built in for Cadence Owned Accounts. The execute phase then iterates through the EVM transactions and uses the Cadence accounts own permissions to sign the EVM transactions.
The loop also handles a check for the optional flag to cancel all of the transactions if any one of them fails. In other words, you could set up a 20 transaction arbitrage attempt and unwind everything if it fails at any step!
EVM child transactions
The next two lines show the transaction hashes for the EVM transactions. To view this in Testnet EVM Flowscan, search for the transaction hashes, the same as any other.
Look up both transactions.
The first calls the deposit() function to wrap FLOW and move it to EVM.
The second calls the ERC-20 approve() function to give another address the authority to spend those tokens.
For the demo, the code for this is hard-coded into src/app/page.tsx:
_38const calls: EVMBatchCall[] = [_38 {_38 // Call deposit() function (wrap FLOW) on the token contract._38 address: '0xd3bF53DAC106A0290B0483EcBC89d40FcC961f3e', // Replace with your actual token contract address._38 abi: [_38 {_38 inputs: [],_38 name: 'deposit',_38 outputs: [],_38 stateMutability: 'payable',_38 type: 'function',_38 },_38 ],_38 functionName: 'deposit',_38 args: [], // deposit takes no arguments; value is passed with the call._38 },_38 {_38 // Call approve() function (ERC20 style) on the same token contract._38 address: '0xd3bF53DAC106A0290B0483EcBC89d40FcC961f3e', // Replace with your actual token contract address if needed._38 abi: [_38 {_38 inputs: [_38 { name: 'spender', type: 'address' },_38 { name: 'value', type: 'uint256' },_38 ],_38 name: 'approve',_38 outputs: [{ name: '', type: 'bool' }],_38 stateMutability: 'nonpayable',_38 type: 'function',_38 },_38 ],_38 functionName: 'approve',_38 args: [_38 '0x2E2Ed0Cfd3AD2f1d34481277b3204d807Ca2F8c2', // Spender address._38 BigInt('1000000000000000000'), // Approve 1 token (assuming 18 decimals)._38 ],_38 },_38];
It's called with the useBatchTransaction hook via the sendBatchTransaction(calls) function.
Code evaluator
The demo also has an embedded code evaluator that you can use to experiment with snippets of code from fcl or wagmi.
For example:
_10const user = await fcl.currentUser().snapshot();_10return user.addr;
Will return your Cadence address. This snippet:
_10const block = await fcl.block();_10return block.height;
Returns the current Cadence VM block number.
Call your own contract
Next, we'll update the starter to connect to and call functions in our own contract. For this, we'll use a simple Button Clicker Contract. You can deploy your own copy, or use the one deployed at 0xA7Cf2260e501952c71189D04FAd17c704DFB36e6.
Set Up contract imports
The following steps assume deployment with Hardhat Ignition. If you use a different deployment method, import the contract address and abi as appropriate.
In your fork of the app, add a folder called contracts to the src folder. In it, copy over ['deployed_addresses.json] from ignition/deployments/chain-545in the Button Clicker repo, andignition/deployments/chain-545/ClickTokenModule#ClickToken.json`.
Next, create a folder called constants and add a file called contracts.ts to it.
In it, import the contract artifact and addresses file, and create export a constant with this information.
_10import ClickToken from '../contracts/ClickTokenModule#ClickToken.json';_10import deployedAddresses from '../contracts/deployed_addresses.json';_10_10export const clickToken = {_10 abi: ClickToken.abi,_10 address: deployedAddresses['ClickTokenModule#ClickToken'] as `0x${string}`,_10};
Build traditional functionality
This isn't a wagmi tutorial, so we'll give you some components to speed up the process. Add a folder called components inside src and add the following files:
TheButton.tsx
_48'use client';_48_48import { useAccount } from 'wagmi';_48import { clickToken } from '../constants/contracts';_48_48interface theButtonProps {_48 // eslint-disable-next-line_48 writeContract: Function;_48 awaitingResponse: boolean;_48 setAwaitingResponse: (value: boolean) => void;_48}_48_48export default function TheButton({_48 writeContract,_48 awaitingResponse,_48 setAwaitingResponse,_48}: theButtonProps) {_48 const account = useAccount();_48_48 function handleClick() {_48 setAwaitingResponse(true);_48 writeContract({_48 abi: clickToken.abi,_48 address: clickToken.address,_48 functionName: 'mintTo',_48 args: [account.address],_48 gas: 45000,_48 });_48 }_48_48 return (_48 <>_48 {!awaitingResponse && (_48 <button_48 onClick={handleClick}_48 className="w-full py-4 px-8 text-2xl font-bold text-white bg-green-500 hover:bg-green-600 rounded-lg shadow-lg transition-transform transform active:scale-95"_48 >_48 Click Me!!!_48 </button>_48 )}_48 {awaitingResponse && (_48 <button className="disabled w-full py-4 px-8 text-2xl font-bold text-white bg-gray-500 rounded-lg shadow-lg">_48 Please Wait..._48 </button>_48 )}_48 </>_48 );_48}
TopTenDisplay.tsx
_110import { useAccount, useReadContract } from 'wagmi';_110import { clickToken } from '../constants/contracts';_110import { useEffect, useState } from 'react';_110import { useQueryClient } from '@tanstack/react-query';_110import { formatUnits } from 'viem';_110_110type scoreBoardEntry = {_110 user: string;_110 value: bigint;_110};_110_110interface TopTenDisplayProps {_110 reloadScores: boolean;_110 setReloadScores: (value: boolean) => void;_110}_110_110export default function TopTenDisplay({_110 reloadScores,_110 setReloadScores,_110}: TopTenDisplayProps) {_110 const [scores, setScores] = useState<scoreBoardEntry[]>([]);_110_110 const account = useAccount();_110 const queryClient = useQueryClient();_110_110 const { data: scoresData, queryKey: getAllScoresQueryKey } = useReadContract({_110 abi: clickToken.abi,_110 address: clickToken.address as `0x${string}`,_110 functionName: 'getAllScores',_110 });_110_110 useEffect(() => {_110 if (scoresData) {_110 const sortedScores = scoresData as scoreBoardEntry[];_110 // Sort scores in descending order_110 sortedScores.sort((a, b) => Number(b.value) - Number(a.value));_110_110 setScores(sortedScores);_110 }_110 }, [scoresData]);_110_110 useEffect(() => {_110 if (reloadScores) {_110 console.log('Reloading scores...');_110 queryClient.invalidateQueries({ queryKey: getAllScoresQueryKey });_110 setReloadScores(false);_110 }_110 }, [reloadScores]);_110_110 function renderAddress(address: string) {_110 return address?.slice(0, 5) + '...' + address?.slice(-3);_110 }_110_110 function renderTopTen() {_110 if (scores.length === 0 || !account) {_110 return (_110 <ol>_110 <li>Loading...</li>_110 </ol>_110 );_110 }_110 // Only display the top 10 scores. If the user is in the top 10, bold the item with their score. If not, show it at the bottom with their ranking number_110 const topTen = scores.length > 10 ? scores.slice(0, 10) : scores;_110 // myRank is my address's position in the array of scores, +1. If it's not present, my rank is the length of the array_110 const myRank =_110 scores.findIndex((entry) => entry.user === account?.address) + 1 ||_110 scores.length + 1;_110_110 const topTenList = topTen.map((entry, index) => {_110 return (_110 <li key={entry.user + index + 1}>_110 {entry.user === account.address ? (_110 <strong>_110 {index + 1} -- {renderAddress(entry.user)} --{' '}_110 {formatUnits(entry.value, 18)}_110 </strong>_110 ) : (_110 <>_110 {index + 1} -- {renderAddress(entry.user)} --{' '}_110 {formatUnits(entry.value, 18)}_110 </>_110 )}_110 </li>_110 );_110 });_110_110 // Append my score if myRank is > 10_110 if (account?.address && (myRank > 10 || myRank > scores.length)) {_110 topTenList.push(_110 <li key={myRank}>_110 <strong>_110 {myRank} -- {renderAddress(account.address.toString())} --{' '}_110 {myRank > scores.length_110 ? 0_110 : formatUnits(scores[myRank - 1].value, 18)}_110 </strong>_110 </li>,_110 );_110 }_110_110 return <ol>{topTenList}</ol>;_110 }_110_110 return (_110 <div>_110 <h3>Top 10 Scores</h3>_110 {renderTopTen()}_110 </div>_110 );_110}
Content.tsx
_61'use client';_61_61import { useEffect, useState } from 'react';_61import TopTenDisplay from './TopTenDisplay';_61import {_61 useWaitForTransactionReceipt,_61 useWriteContract,_61 useAccount,_61} from 'wagmi';_61import TheButton from './TheButton';_61_61export default function Content() {_61 const [reload, setReload] = useState(false);_61 const [awaitingResponse, setAwaitingResponse] = useState(false);_61_61 const account = useAccount();_61_61 const { data, writeContract, error: writeError } = useWriteContract();_61_61 const { data: receipt, error: receiptError } = useWaitForTransactionReceipt({_61 hash: data,_61 });_61_61 useEffect(() => {_61 if (receipt) {_61 console.log('Transaction receipt:', receipt);_61 setReload(true);_61 setAwaitingResponse(false);_61 }_61 }, [receipt]);_61_61 useEffect(() => {_61 if (writeError) {_61 console.error(writeError);_61 setAwaitingResponse(false);_61 }_61 }, [writeError]);_61_61 useEffect(() => {_61 if (receiptError) {_61 console.error(receiptError);_61 setAwaitingResponse(false);_61 }_61 }, [receiptError]);_61_61 return (_61 <div className="card gap-1">_61 {account.address && (_61 <div className="mb-4">_61 <TheButton_61 writeContract={writeContract}_61 awaitingResponse={awaitingResponse}_61 setAwaitingResponse={setAwaitingResponse}_61 />_61 </div>_61 )}_61 <br />_61 {<TopTenDisplay reloadScores={reload} setReloadScores={setReload} />}_61 </div>_61 );_61}
Then, import and add <Content /> to page.tsx:
_15return (_15 <>_15 <div style={{ display: 'flex', justifyContent: 'flex-end', padding: 12 }}>_15 <ConnectButton />_15 </div>_15 <h3>Flow Address: {flowAddress}</h3>_15 <h3>EVM Address: {coa?.address}</h3>_15 <br />_15 <button onClick={() => sendBatchTransaction(calls)}>_15 Send Batch Transaction Example_15 </button>_15 {<p>{JSON.stringify({ isPending, isError, txId, results })}</p>}_15 <Content />_15 </>_15);
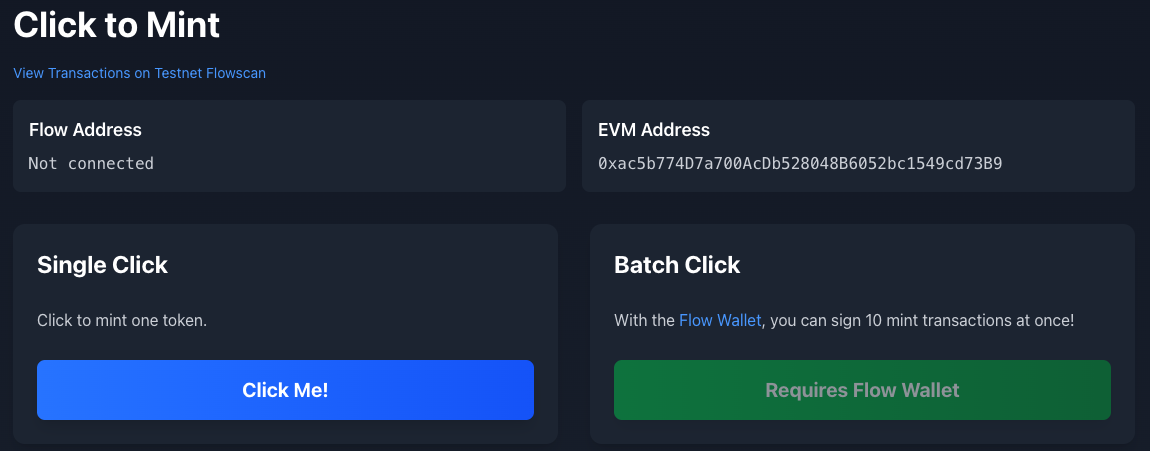
You'll now see the button and scoreboard from the contract. Test it out and earn a few points!

Supercharge your EVM app With Cadence
Now let's supercharge it. With the power of Cadence, you can use multi-call write and give your users way more tokens with a single click and single signature!
For the first pass, we'll skip some organization best practices.
Import clickToken into page.tsx and update calls to instead call the mint function from the Button Clicker contract.
_10const calls: EVMBatchCall[] = [_10 {_10 address: clickToken.address,_10 abi: clickToken.abi as Abi,_10 functionName: 'mintTo',_10 args: [coa?.address],_10 },_10];
Click Send Batch Transaction Example again. You'll have to manually refresh the page when the EVM transaction hash appears to see the score update. We haven't wired in the query invalidation yet.
Next, use some JavaScript to put 10 copies of the transaction call into the array:
_10const calls: EVMBatchCall[] = Array.from({ length: 10 }, () => ({_10 address: clickToken.address,_10 abi: clickToken.abi as Abi,_10 functionName: 'mintTo',_10 args: [coa?.address],_10}));
Click the button again and manually refresh page after the transaction hashes appear.
You just minted 10 tokens from 10 transactions with one signature!
Improve the UI/UX
While the batched transactions feature works, we've got a few flaws in the user experience that we'll need to resolve, and we should make this look a bit nicer.
Install Tailwind
We initially tried to get an AI friend to install this for us and it got very confused. Next.js and Tailwind have both had a lot of change recently. As a result, the LLMs don't seem to have caught up just yet.
Do this part the old-fashioned way.
The components we borrowed already use Tailwind, so install it:
_10npm install tailwindcss @tailwindcss/postcss postcss
Then, in the root of the project, add postcss.config.mjs and add:
_10const config = {_10 plugins: {_10 '@tailwindcss/postcss': {},_10 },_10};_10export default config;
Then, add the following to the top of src/styles/global.css:
_10@import 'tailwindcss';
Run the app and make sure you see some styling. It won't look nice yet. We'll help you reorganize the components and hook up state monitoring, but it will be up to you to style the app how you'd like. You can check out the reference repo for inspiration, but it's far from perfect or beautiful.
Update state display
The first thing we'll need to fix is that the user has to refresh the window manually to see the results of the batched transaction in the scoreboard. To start, move the functionality in page.tsx into a new component, called SuperButton.tsx. We mimic the pattern in TheButton.tsx where the blockchain state is managed in Content.tsx, and we pass in the relevant information and functions as props:
_76'use client';_76_76import { useAccount } from 'wagmi';_76import { clickToken } from '../constants/contracts';_76import { CallOutcome, EVMBatchCall } from '../hooks/useBatchTransaction';_76import { Abi } from 'viem';_76_76interface SuperButtonProps {_76 flowAddress: string | null;_76 awaitingResponse: boolean;_76 setAwaitingResponse: (value: boolean) => void;_76 sendBatchTransaction: (calls: EVMBatchCall[]) => void;_76 isPending: boolean;_76 isError: boolean;_76 txId: string;_76 results: CallOutcome[];_76}_76_76export default function SuperButton({_76 flowAddress,_76 awaitingResponse,_76 setAwaitingResponse,_76 sendBatchTransaction,_76 isPending,_76 isError,_76 txId,_76 results,_76}: SuperButtonProps) {_76 const account = useAccount();_76_76 const calls: EVMBatchCall[] = Array.from({ length: 10 }, () => ({_76 address: clickToken.address,_76 abi: clickToken.abi as Abi,_76 functionName: 'mintTo',_76 args: [account?.address],_76 }));_76_76 function handleClick() {_76 setAwaitingResponse(true);_76 sendBatchTransaction(calls);_76 }_76_76 return (_76 <div className="bg-blue-500 text-white p-4 m-4 rounded">_76 <div>_76 With the{' '}_76 <a_76 href="https://wallet.flow.com/"_76 target="_blank"_76 rel="noopener noreferrer"_76 >_76 Flow Wallet_76 </a>_76 , you can sign 10 mint transactions at once!_76 </div>_76 {!awaitingResponse && (_76 <button_76 disabled={!flowAddress}_76 onClick={handleClick}_76 className="w-full py-4 px-8 text-2xl font-bold text-white bg-blue-600 hover:bg-blue-700 rounded-lg shadow-lg transition-transform transform active:scale-95 disabled:bg-gray-400 disabled:cursor-not-allowed"_76 >_76 {flowAddress ? 'Mint 10 at Once!' : 'Requires Flow Wallet'}_76 </button>_76 )}_76 {awaitingResponse && (_76 <button_76 className="w-full py-4 px-8 text-2xl font-bold text-white bg-gray-500 rounded-lg shadow-lg disabled:cursor-not-allowed"_76 disabled_76 >_76 Please Wait..._76 </button>_76 )}_76 {<p>{JSON.stringify({ isPending, isError, txId, results })}</p>}_76 </div>_76 );_76}
You will end up with a vastly simplified page.tsx:
_11import Content from '../components/Content';_11_11function Page() {_11 return (_11 <>_11 <Content />_11 </>_11 );_11}_11_11export default Page;
Next, update Content.tsx. First, add the decomposition of the useBatchTransactions hook that used to be in page.tsx. You'll keep blockchain-state-related code here, in a similar pattern to useWriteTransaction.
_10import { useBatchTransaction } from '../hooks/useBatchTransaction';
_10const { sendBatchTransaction, isPending, isError, txId, results } =_10 useBatchTransaction();
You'll also need to move the useEffect that subscribes to the current user on the Cadence side:
_10useEffect(() => {_10 const unsub = fcl.currentUser().subscribe((user: CurrentUser) => {_10 setFlowAddress(user.addr ?? null);_10 });_10 return () => unsub();_10}, []);
Then, update the useEffect that waits for a receipt to also trigger if results is updated with the result of a batched transaction:
_10useEffect(() => {_10 if (receipt || results.length > 0) {_10 console.log('Transaction receipt:', receipt);_10 setReload(true);_10 setAwaitingResponse(false);_10 }_10}, [receipt, results]);
Finally, reorganize the return into two side-by-side cards and put the new component in the right card:
_35return (_35 <div>_35 <div className="flex justify-end p-3">_35 <ConnectButton />_35 </div>_35 <h3>Flow Address: {flowAddress}</h3>_35 <h3>EVM Address: {account?.address}</h3>_35 <br />_35 <div className="flex flex-row items-center justify-center">_35 <div className="bg-green-500 text-white p-4 m-4 rounded">_35 {account.address && (_35 <div className="mb-4">_35 <TheButton_35 writeContract={writeContract}_35 awaitingResponse={awaitingResponse}_35 setAwaitingResponse={setAwaitingResponse}_35 />_35 </div>_35 )}_35 <br />_35 </div>_35 <SuperButton_35 flowAddress={flowAddress}_35 awaitingResponse={awaitingResponse}_35 setAwaitingResponse={setAwaitingResponse}_35 sendBatchTransaction={sendBatchTransaction}_35 isPending={isPending}_35 isError={isError}_35 txId={txId}_35 results={results}_35 />_35 </div>_35 {<TopTenDisplay reloadScores={reload} setReloadScores={setReload} />}_35 </div>_35);
Tests
Run the app and make sure it works as expected, even if in a rather ugly fashion.
Add UI hints
With this kind of app, you're likely to have two types of users. Those that have upgraded to the [Flow Wallet] can take advantage of advanced features such as batched transactions, and those who haven't cannot.
It's up to you do design a comprehensive strategy for your app, but here, we can at least let users know what's going on. Add some explainer text, and configure the button to show an appropriate message and disable itself if the wallet won't support it.
_10<div>_10 With the <a href="https://flow.com/wallet" target="_blank" rel="noopener noreferrer">Flow Wallet</a>, you can sign 10 mint transactions at once!_10</div>_10<button disabled={!flowAddress} onClick={() => sendBatchTransaction(calls)}>_10 {flowAddress ? 'Mint 10 at Once!' : 'Requires Flow Wallet'}_10</button>
Style
It's up to you to make the app pretty. If you need inspiration, you can always check the reference repo.
Conclusion
In this tutorial, you reviewed the demo starter to build hybrid applications that use a common EVM stack and integrate with Flow Cadence. You then added functionality to interface with another contract that mints ERC-20 tokens. Finally, you supercharged your app with the power of Cadence for EVM multi-call contract writes.
Now that you have completed the tutorial, you will be able to:
- Build an app that seamlessly integrates Flow Cadence and Flow EVM connections.
- Add Cadence features to your Rainbowkit/wagmi/viem app.
- Use Flow Client Library (FCL) to enable multi-call contract writes to Flow EVM.