Wallet Discovery
Wallet Discovery
It's a challenge to know all the wallets available to users on a blockchain. Flow Client Library's (FCL) Discovery mechanism relieves much of the burden of Flow compatible wallet integration and lets developers focus on building their dApp and providing as many options as possible to their users.
There are two ways an app can use Discovery:
- The UI version which can be configured for display via iFrame, Popup, or Tab.
- The API version which allows you to access authentication services directly in your code via
fcl.discovery.authnmethod which we'll describe below.
UI version
When a user authenticates via FCL with Discovery UI, they receive a list of services they can use to login.
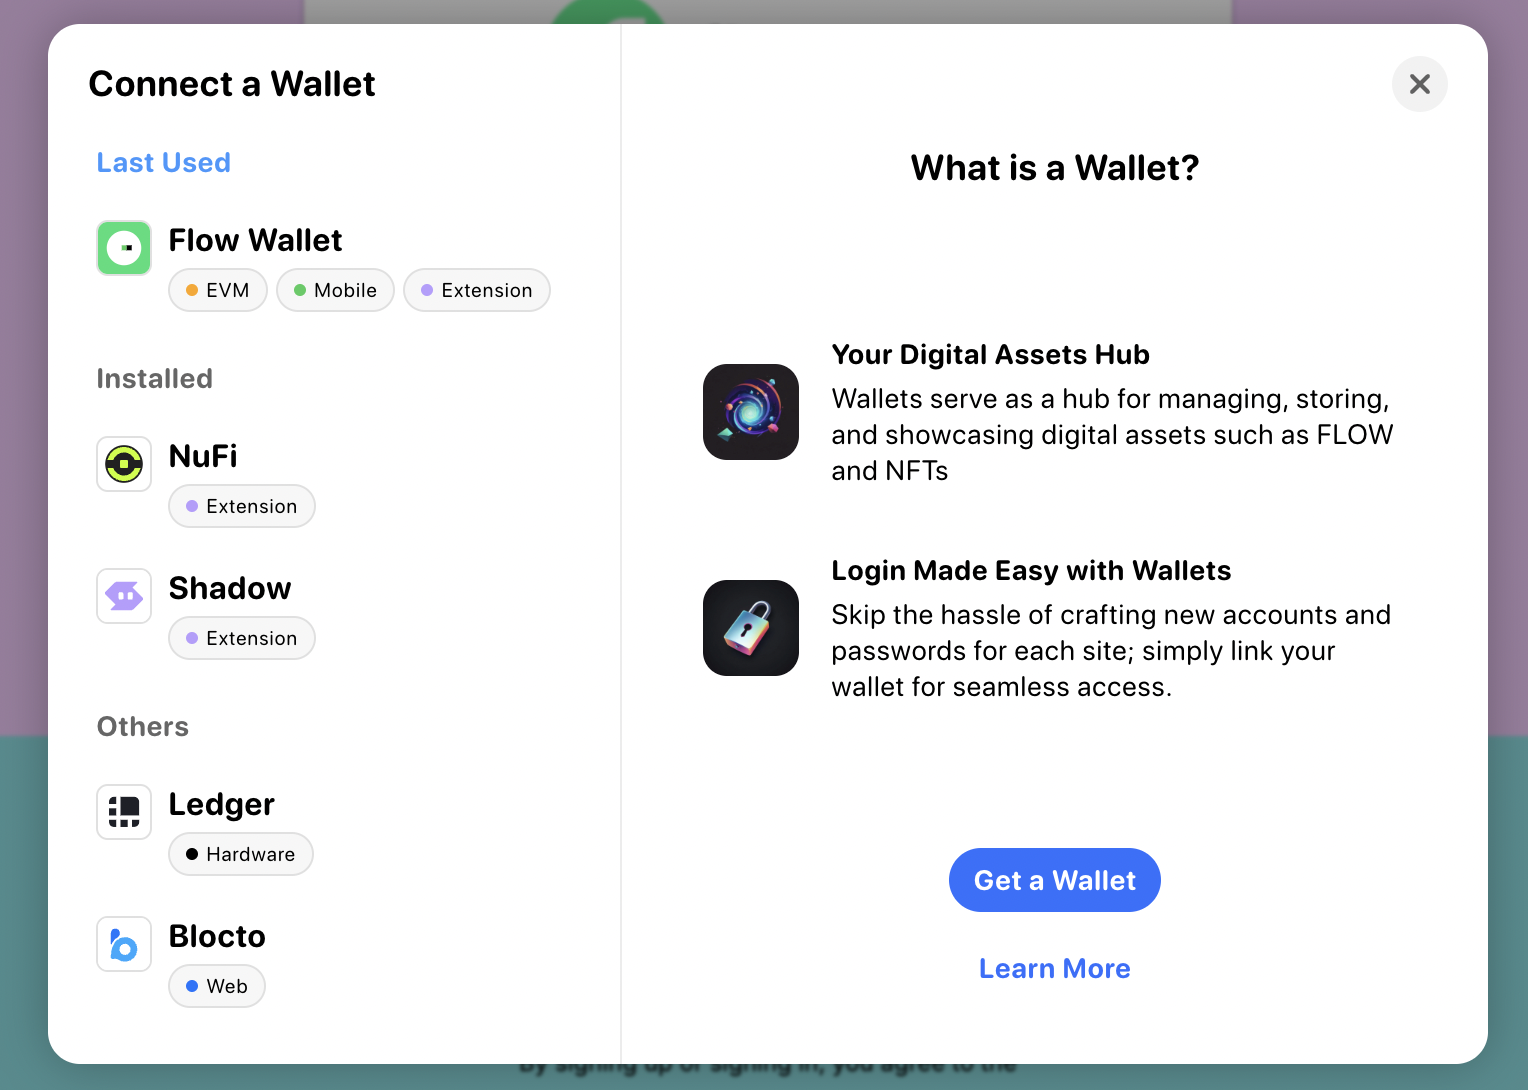
This method is the simplest way to integrate Discovery and its wallets and services into your app. All you have to do is configure discovery.wallet with the host endpoint for testnet or mainnet.
Opt-in wallets, like Ledger and Dapper Wallet, require you to explicitly state you'd like to use them. For more information on how to include opt-in wallets, see these docs.
A Dapper Wallet developer account is required. To turn on Dapper Wallet inside FCL, you need to follow this guide.
_10import { config } from '@onflow/fcl';_10_10config({_10 'accessNode.api': 'https://rest-testnet.onflow.org',_10 'discovery.wallet': 'https://fcl-discovery.onflow.org/testnet/authn',_10});
Any time you call fcl.authenticate the user will be presented with that screen.
To change the default view from iFrame to popup or tab set discovery.wallet.method to POP/RPC (opens as a popup) or TAB/RPC (opens in a new tab). For more info about service methods, see here.
Branding Discovery UI
As of version 0.0.79-alpha.4, dApps can now display an app title and app icon in the Discovery UI when you a few values in their FCL app config. This branding provides users with messaging that has clear intent before they authenticate to add a layer of trust.
All you have to do is set app.detail.icon and app.detail.title like this:
_10import { config } from '@onflow/fcl';_10_10config({_10 'app.detail.icon': 'https://placekitten.com/g/200/200',_10 'app.detail.title': 'Kitten Dapp',_10});
If these configuration options aren't set, dApps that use the Discovery API will still display a default icon and "Unknown App" as the title when they attempt to authorize a user who is not logged in. We highly recommended that you set these values accurately before you go live.
API version
If you want more control over your authentication UI, the Discovery API is also simple to use as it exposes Discovery directly in your code via fcl.
Setup still requires configuration of the Discovery endpoint, but when you use the API, it is set via discovery.authn.endpoint as shown below.
_10import { config } from '@onflow/fcl';_10_10config({_10 'accessNode.api': 'https://rest-testnet.onflow.org',_10 'discovery.authn.endpoint':_10 'https://fcl-discovery.onflow.org/api/testnet/authn',_10});
You can access services in your Dapp from fcl.discovery:
_10import * as fcl from '@onflow/fcl';_10_10fcl.discovery.authn.subscribe(callback);_10_10// OR_10_10fcl.discovery.authn.snapshot();
To authenticate with a service (for example, when a user click's "login"), pass the selected service to the fcl.authenticate method described in the API reference:
_10fcl.authenticate({ service });
A simple React component may end up looking like this:
_24import './config';_24import { useState, useEffect } from 'react';_24import * as fcl from '@onflow/fcl';_24_24function Component() {_24 const [services, setServices] = useState([]);_24 useEffect(_24 () => fcl.discovery.authn.subscribe((res) => setServices(res.results)),_24 [],_24 );_24_24 return (_24 <div>_24 {services.map((service) => (_24 <button_24 key={service.provider.address}_24 onClick={() => fcl.authenticate({ service })}_24 >_24 Login with {service.provider.name}_24 </button>_24 ))}_24 </div>_24 );_24}
Helpful fields for your UI can be found in the provider object inside of the service. Fields include the following:
_13{_13 ...,_13 "provider": {_13 "address": "0xf086a545ce3c552d",_13 "name": "Blocto",_13 "icon": "/images/blocto.png",_13 "description": "Your entrance to the blockchain world.",_13 "color": "#afd8f7",_13 "supportEmail": "support@blocto.app",_13 "authn_endpoint": "https://flow-wallet-testnet.blocto.app/authn",_13 "website": "https://blocto.portto.io"_13 }_13}
Network configuration
Discovery UI URLs
| Environment | Example |
|---|---|
| Mainnet | https://fcl-discovery.onflow.org/authn |
| Testnet | https://fcl-discovery.onflow.org/testnet/authn |
| Local | https://fcl-discovery.onflow.org/local/authn |
Discovery API endpoints
| Environment | Example |
|---|---|
| Mainnet | https://fcl-discovery.onflow.org/api/authn |
| Testnet | https://fcl-discovery.onflow.org/api/testnet/authn |
| Local | https://fcl-discovery.onflow.org/api/local/authn |
Local will return Dev Wallet on emulator for local development with the default port of 8701. If you'd like to override the default port, add ?port=0000 and set the port to whatever you'd like to override it to.
Other configuration
Configuration works across both UI and API versions of Discovery.
Include opt-in wallets
Start in FCL v0.0.78-alpha.10
Opt-in wallets are those that don't have support for authentication, authorization, and user signature services. Or, support only a limited set of transactions.
You can include opt-in wallets with either wallet UIDs (recommended) or service account addresses:
Use wallet UIDs (recommended):
_10import * as fcl from '@onflow/fcl';_10_10fcl.config({_10 'discovery.wallet': 'https://fcl-discovery.onflow.org/testnet/authn',_10 'discovery.authn.endpoint':_10 'https://fcl-discovery.onflow.org/api/testnet/authn',_10 'discovery.authn.include': ['dapper-wallet', 'ledger'], // Wallet UIDs_10});
Use service Aacount addresses:
_10import * as fcl from '@onflow/fcl';_10_10fcl.config({_10 'discovery.wallet': 'https://fcl-discovery.onflow.org/testnet/authn',_10 'discovery.authn.endpoint':_10 'https://fcl-discovery.onflow.org/api/testnet/authn',_10 'discovery.authn.include': ['0x82ec283f88a62e65', '0x9d2e44203cb13051'], // Testnet addresses_10});
Opt-In Wallet Identifiers
| Wallet | Wallet UID | Mainnet Address | Testnet Address |
|---|---|---|---|
| Dapper Wallet | dapper-wallet | 0xead892083b3e2c6c | 0x82ec283f88a62e65 |
| Ledger | ledger | 0xe5cd26afebe62781 | 0x9d2e44203cb13051 |
To learn more about other possible configurations, check out the Discovery Github Repo.
Exclude wallets
To exclude wallets from FCL Discovery, you can use the discovery.authn.exclude configuration option. You can specify wallets with either wallet UIDs (recommended) or service account addresses:
Use wallet UIDs (recommended):
_10import * as fcl from '@onflow/fcl';_10_10fcl.config({_10 'discovery.wallet': 'https://fcl-discovery.onflow.org/testnet/authn',_10 'discovery.authn.endpoint':_10 'https://fcl-discovery.onflow.org/api/testnet/authn',_10 'discovery.authn.exclude': ['nufi'], // Wallet UIDs to exclude_10});
Use service account addresses:
_10import * as fcl from '@onflow/fcl';_10_10fcl.config({_10 'discovery.wallet': 'https://fcl-discovery.onflow.org/testnet/authn',_10 'discovery.authn.endpoint':_10 'https://fcl-discovery.onflow.org/api/testnet/authn',_10 'discovery.authn.exclude': ['0x123', '0x456'], // Service account addresses to exclude_10});
Available wallet UIDs
You can use any of the following wallet identifiers with discovery.authn.include or discovery.authn.exclude:
| Wallet | UID | Mainnet Address | Testnet Address | Type |
|---|---|---|---|---|
| Flow Wallet | flow-wallet | 0x33f75ff0b830dcec | 0x33f75ff0b830dcec | Default |
| NuFi | nufi | 0x95b85a9ef4daabb1 | - | Default |
| Blocto | blocto | 0x55ad22f01ef568a1 | 0x55ad22f01ef568a1 | Default |
| Dapper Wallet | dapper-wallet | 0xead892083b3e2c6c | 0x82ec283f88a62e65 | Opt-in |
| Ledger | ledger | 0xe5cd26afebe62781 | 0x9d2e44203cb13051 | Opt-in |
Default wallets appear in Discovery by default. Opt-in wallets must be explicitly included with discovery.authn.include. You can use either the wallet UID or the service account address to filter.
For the most up-to-date list of available wallets, see the fcl-discovery wallet data in the official repository.
WalletConnect configuration
To configure WalletConnect, add a WalletConnect project ID to the FCL config:
_10import * as fcl from '@onflow/fcl';_10_10fcl.config({_10 'walletconnect.projectId': 'YOUR_WALLETCONNECT_PROJECT_ID',_10});