Setting Up a Flow Access Node
This guide is for running a permissonless Access node on Flow. If you are planning to run a different type of staked node then see node bootstrap.
Permissionless Access nodes allow any operator to run a Flow Access node. Unlike the other staked nodes, a permissionless access node does not have to be approved by the service account before it can join the network, hence the term "permissionless". The goal is to make all node types permissionless and this is the first step towards achieving that goal.
Who Should Run a Permissionless Access Node?
dApp developers can choose to run their own private permissionless access node and move away from using the community access nodes. This will also allow them to not be subjected to the API rate limits of the public access nodes.
Node operators can also run their own permissionless access node and provide access to that node as a service.
Chain analytics, audit and exploration applications can run such an access node and do not have to rely on third parties for the state of the network.
Timing
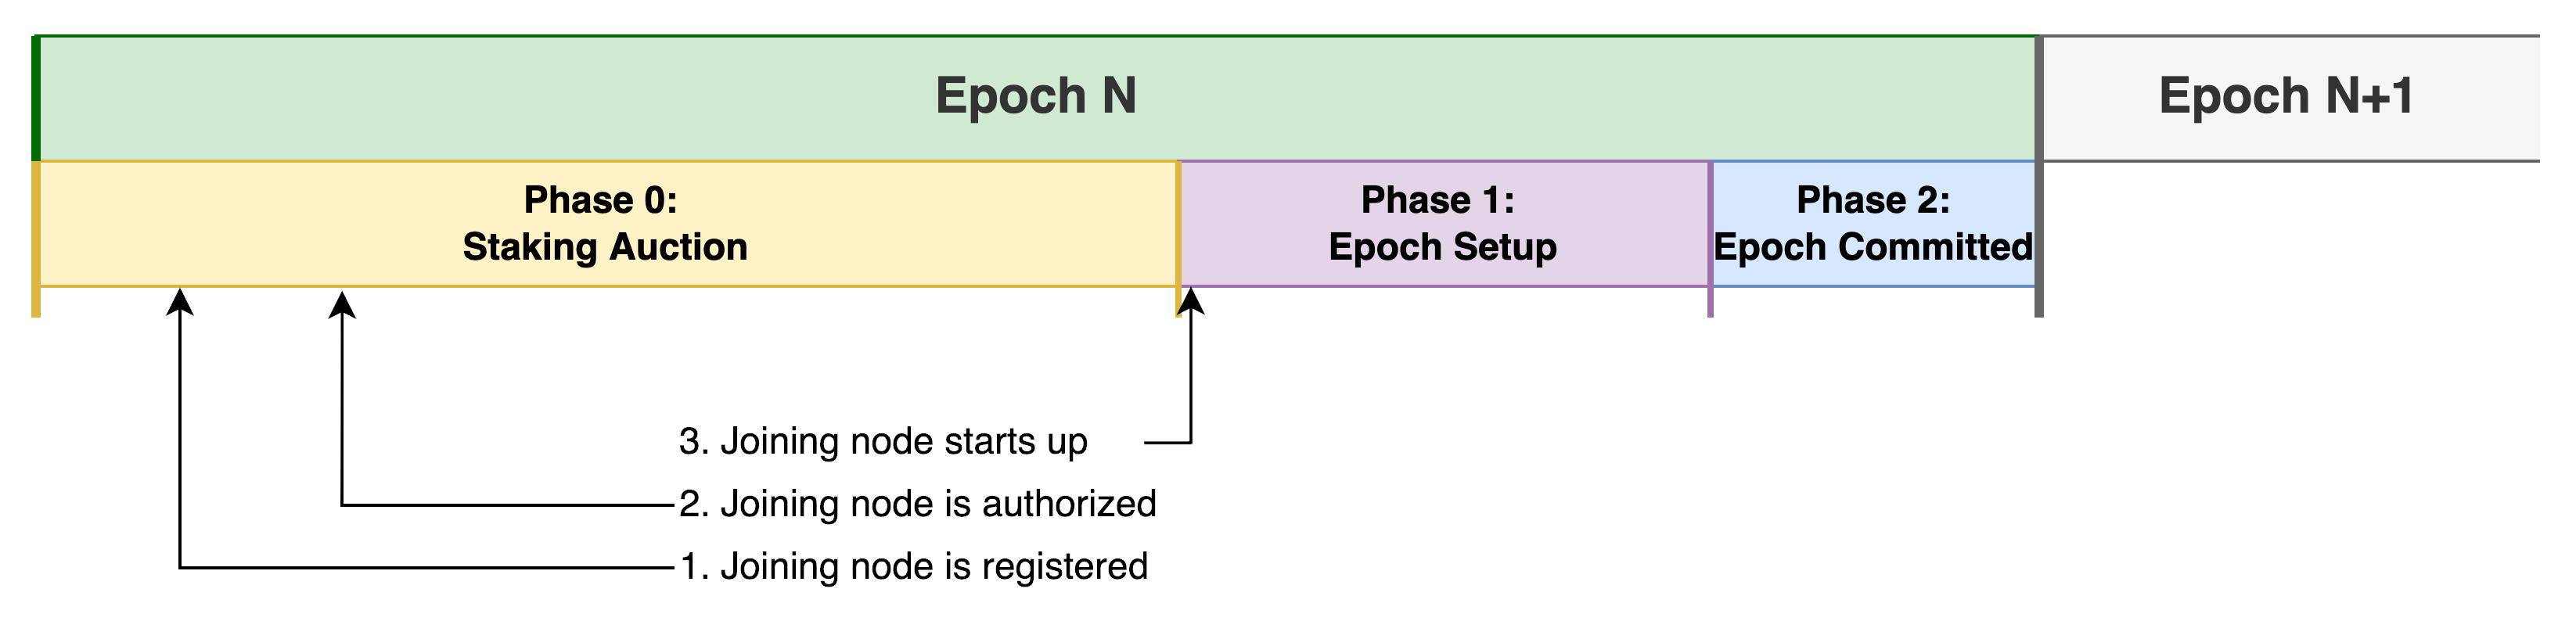
New nodes are able to join the network each time a new epoch begins. An epoch is a period of time (approximately one week) when the node operators in the network are constant. At epoch boundaries, newly staked node operators are able to join the network and existing node operators which have unstaked may exit the network. You can read more about epochs here.
In order to join the network at epoch N+1, the access node must be registered with at least 100 FLOW staked prior to the end of epoch N's Staking Auction Phase.
Currently on mainnet, the staking auction starts every Wednesday at around 20:00 UTC and ends on the next Wednesday at around 12:00 UTC. Since this deadline may shift slightly from epoch to epoch, we recommend the node be staked by Wednesday, 8:00 UTC to be able to join the network in the next epoch.
Confirmation of a new node's inclusion in epoch N+1 is included in the EpochSetup event.
Limitations
There are five open slots for access nodes every epoch.
You can view the exact epoch phase transition time here under Epoch Phase.
To summarize,
| Epoch | Epoch Phase | |
|---|---|---|
| N | Staking auction starts | Three new access node slots are opened. Anyone can register their access nodes |
| N | Staking auction ends | Three of the nodes registered during this epoch are randomly selected to be a part of the network in the next epoch. No more nodes can register until the next epoch starts. |
| N+1 | Epoch N+1 starts | The newly selected nodes can now participate in the network. Three new slots are opened. |
How To Run a Permissionless Access Node?
To run an access node you will need to provision a machine or virtual machine to run your node software. Please follow the node-provisioning guide for it. You can provision the machine before or after your node has been chosen.
At a high level, to run a permissionless Access node, you will have to do the following steps:
- Generate the node identity (private and public keys, node ID etc.).
- Stake the node with 100 FLOW by the end of the staking phase of the current epoch (see timing) by providing the node information generated in step 1.
- You can verify if your node ID was selected by the onchain random selection process on Wednesday at around 20:00 UTC when the next epoch starts.
- If your node ID was selected, you can provision and start running the node. If your node wasn't selected, your tokens will have been refunded to your unstaked bucket in the staking smart contract. When the next epoch begins, you can try committing tokens again in a future epoch to get a new spot.
Following is a detail explanation of these four steps. If you want to run multiple access nodes, you will have to run through these steps for each node.
Step 1 - Generate Node Information
Download the Bootstrapping Kit
_10curl -sL -O storage.googleapis.com/flow-genesis-bootstrap/boot-tools.tar_10tar -xvf boot-tools.tar
If you have downloaded the bootstrapping kit previously, ensure the SHA256 hash for it still matches. If not, re-download to ensure you are using the most up-to-date version.
Generate Your Node Identity
_10#########################################################_10# Generate Keys_10$ mkdir ./bootstrap_10# YOUR_NODE_ADDRESS: FQDN associated to your instance_10$ ./boot-tools/bootstrap key --address "<YOUR_NODE_ADDRESS_GOES_HERE>:3569" --role access -o ./bootstrap
Use a fully qualified domain name for the network address. Please also include the port number in the network address e.g. flowaccess.mycompany.com:3569
Do not include the prefix http:// in the network address.
If you would like to stake multiple access nodes, please ensure you generate a unique identity for each node.
Your node identity has now been generated. Your node ID can be found in the file ./bootstrap/public-root-information/node-id.
All your private keys should be in the bootstrap folder created earlier. Please take a back up of the entire folder.
Step 2 - Stake the Node
You need to now register the node on chain by staking the node via Flow Port.
Here is a guide on how to use Flow port if you are not familiar with it. If you are staking via a custody provider or would like to directly submit a staking transaction instead follow this guide.
Fund you Flow account with at least 100.01 FLOW tokens, which covers the required stake plus the storage deposit.
On Flow port, choose Stake and Delegate -> Start Staking or Stake Again and then choose Access node as the option.

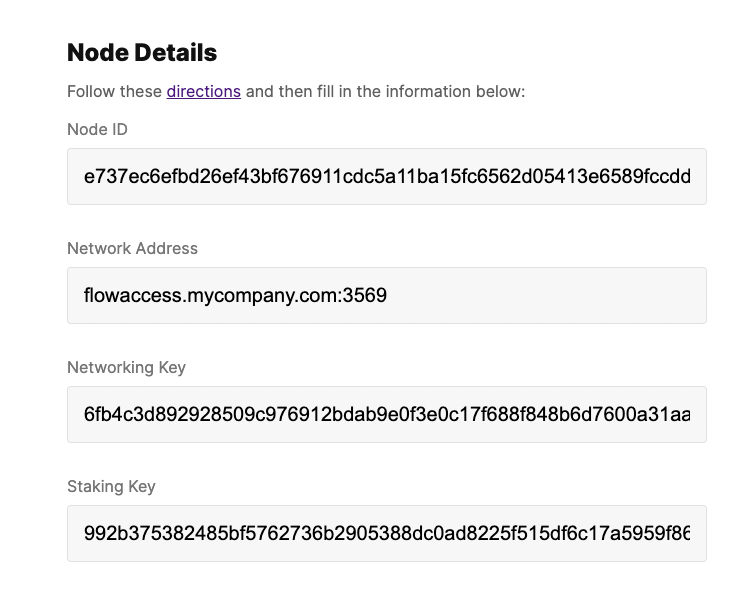
On the next screen, provide the node details of you node.
Those node details (Node ID, Network Address, Networking Key and Staking Key) can be found in the file: ./bootstrap/public-root-information/node-info.pub.<node-id>.json.
Example
On the next screen, ensure that you stake 100 FLOW token.
Example
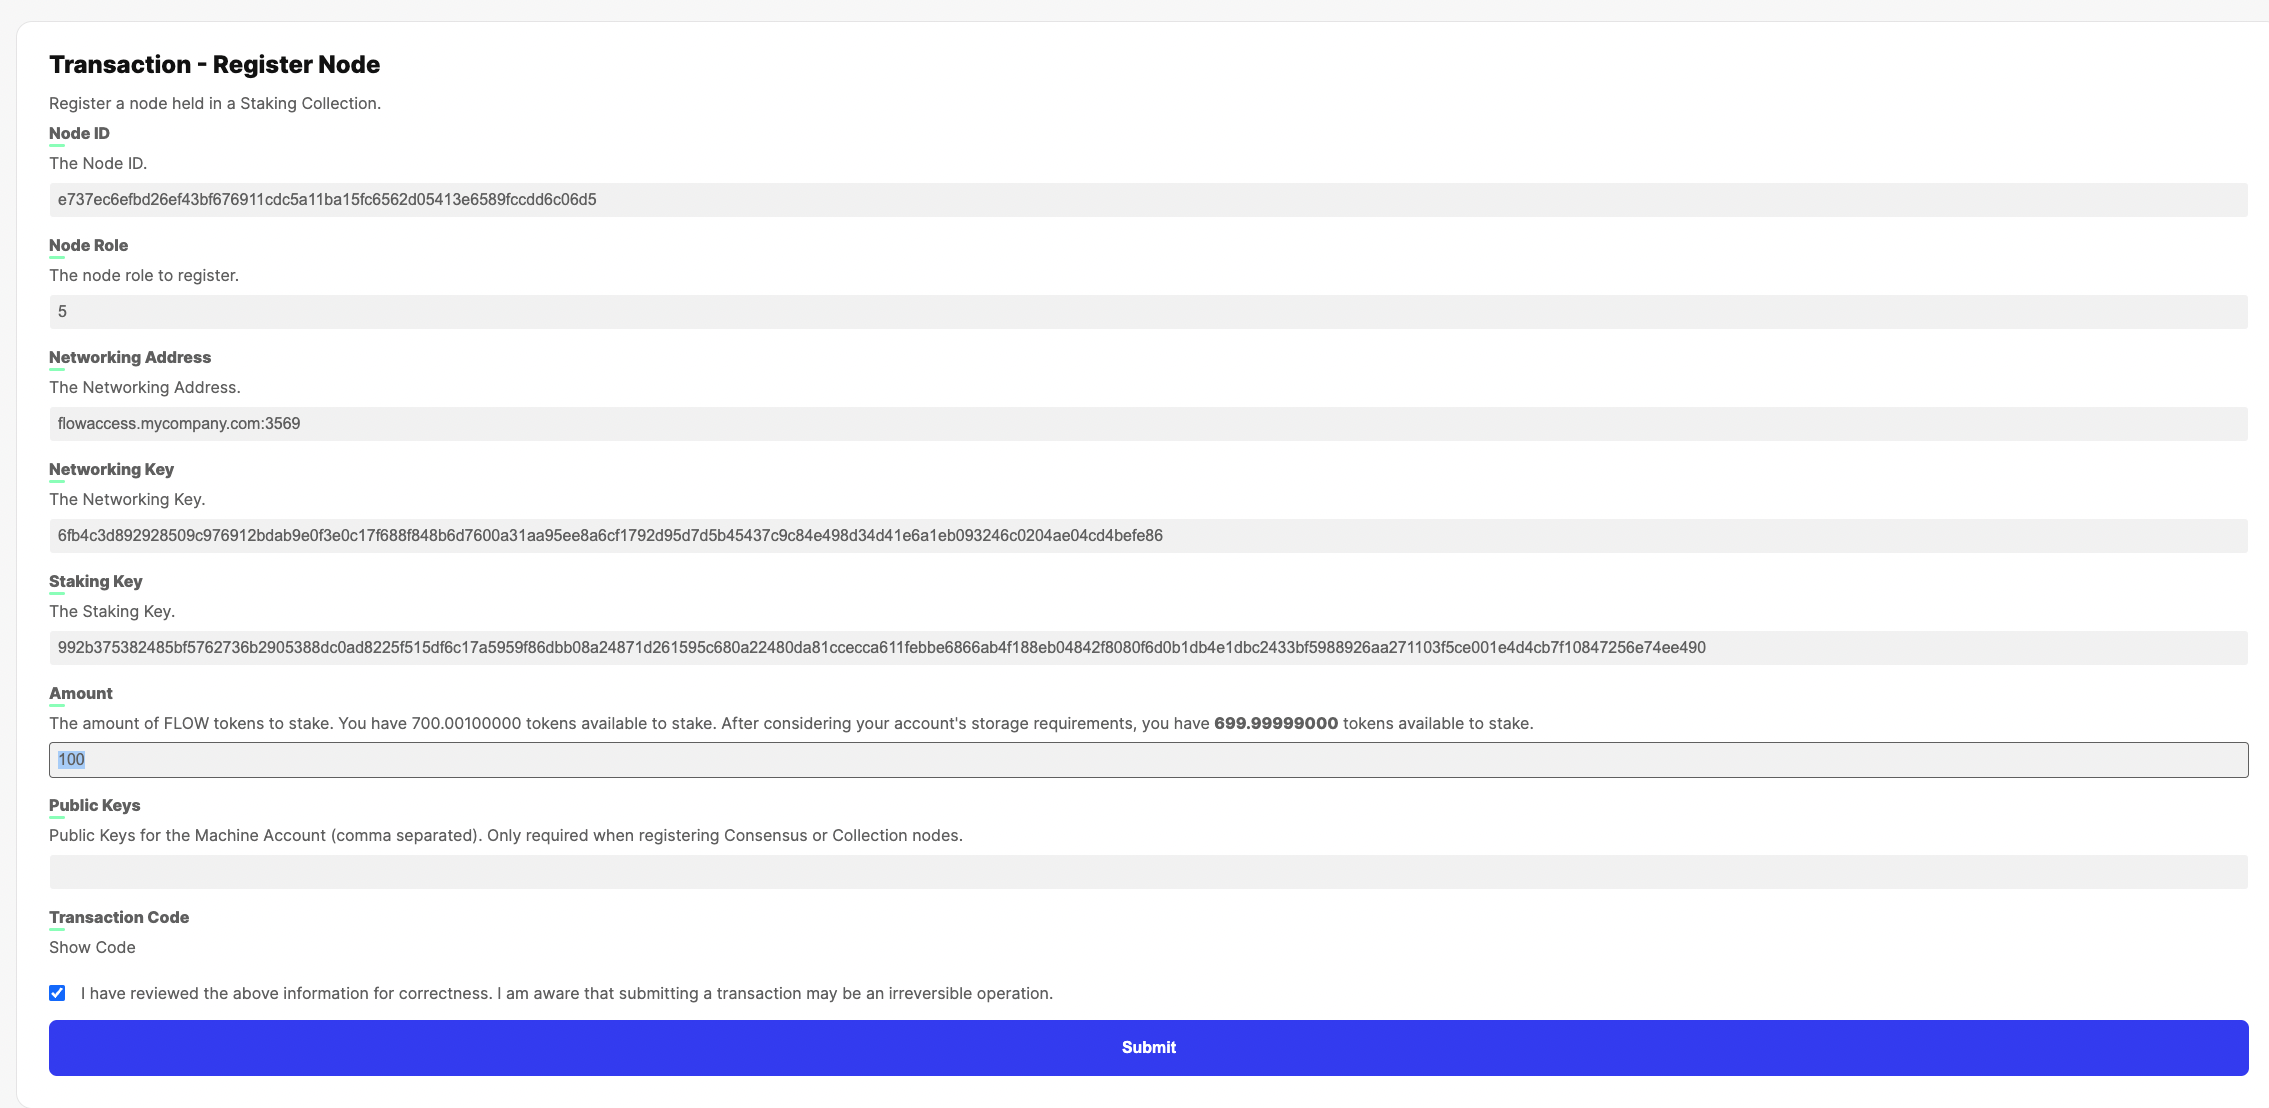
Submit the Transaction.
Step 3 - Verify That Your Node ID Was Selected
On Wednesday at around 12:00 UTC, the staking auction for the current epoch will end and five nodes from candidate list of nodes will be chosen at random by the staking contract to be part of the next epoch.
If all 5 slots have been taken from the previous epoch, then no new access nodes will be chosen (see #limitations)
There are several ways to verify whether your node was chosen as explained below.
When you stake the node, the tokens will show up under the tokensCommitted bucket. After the staking auction ends, if the node is selected, the tokens remain in the tokensCommitted bucket and are moved to the tokensStaked bucket at the end of the epoch.
If the node is not selected, the tokens are moved to the tokensUnstaked bucket.
Check Using Flow Port
You can check these balances on Flow Port before and after the epoch transition that will occur on Wednesday (see timing).
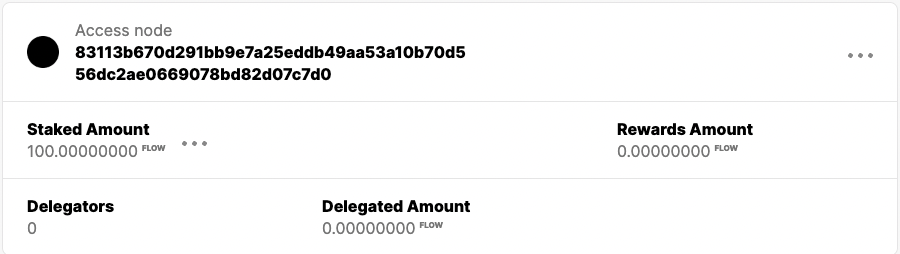
When you stake the node, you should see the following on Flow Port under Stake & Delegate
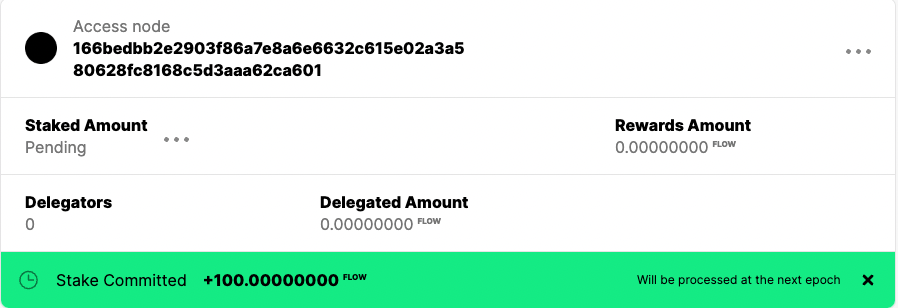
After the epoch transition, if you see you token balance under the Staked Amount then your node got chosen.
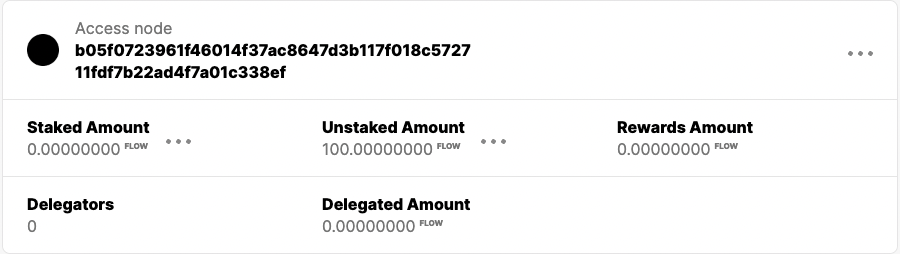
Instead, if you see that your token balance is under the Unstaked Amount, then your node did not get chosen.
Check Using Flow CLI
You can also check these balance using Flow Cli. Once you have downloaded and installed Flow Cli, you can query the account balance using the command,
_10flow accounts staking-info <your account address> -n mainnet
For Example, the following node was chosen as Tokens staked is 100.
Epoch Setup Event
Alternatively, if you can monitor events, look for the epoch setup event that gets emitted by the epoch contract. That event is emitted at the end of epoch N's staking auction and contains a list of node IDs that are confirmed for the next epoch.
Step 4 - Start Your Node
If your node was selected as part of Step 3, you can now start your node.
First you'll need to provision a machine or virtual machine to run your node software. Please see follow the node-provisioning guide for it.
The access node can be run as a Docker container with the following command.
Be sure to set $VERSION below to the version tag (e.g. v1.2.3) corresponding to the latest released version here for version releases). Set $NODEID to your node's ID (see Generate Your Node Identity section above).
- Mainnet
- Testnet
_19docker run --rm \_19-v $PWD/bootstrap:/bootstrap:ro \_19-v $PWD/data:/data:rw \_19--name flow-go \_19--network host \_19gcr.io/flow-container-registry/access:$VERSION \_19--nodeid=$NODEID \_19--bootstrapdir=/bootstrap \_19--datadir=/data/protocol \_19--secretsdir=/data/secrets \_19--rpc-addr=0.0.0.0:9000 \_19--http-addr=0.0.0.0:8000 \_19--rest-addr=0.0.0.0:80 \_19--rpc-metrics-enabled=true \_19--bind 0.0.0.0:3569 \_19--dynamic-startup-access-address=secure.mainnet.nodes.onflow.org:9001 \_19--dynamic-startup-access-publickey=28a0d9edd0de3f15866dfe4aea1560c4504fe313fc6ca3f63a63e4f98d0e295144692a58ebe7f7894349198613f65b2d960abf99ec2625e247b1c78ba5bf2eae \_19--dynamic-startup-epoch-phase=EpochPhaseStaking \_19--loglevel=error
_19docker run --rm \_19-v $PWD/bootstrap:/bootstrap:ro \_19-v $PWD/data:/data:rw \_19--name flow-go \_19--network host \_19gcr.io/flow-container-registry/access:$VERSION \_19--nodeid=$NODEID \_19--bootstrapdir=/bootstrap \_19--datadir=/data/protocol \_19--secretsdir=/data/secrets \_19--rpc-addr=0.0.0.0:9000 \_19--http-addr=0.0.0.0:8000 \_19--rest-addr=0.0.0.0:80 \_19--rpc-metrics-enabled=true \_19--bind 0.0.0.0:3569 \_19--dynamic-startup-access-address=secure.testnet.nodes.onflow.org:9001 \_19--dynamic-startup-access-publickey=ba69f7d2e82b9edf25b103c195cd371cf0cc047ef8884a9bbe331e62982d46daeebf836f7445a2ac16741013b192959d8ad26998aff12f2adc67a99e1eb2988d \_19--dynamic-startup-epoch-phase=EpochPhaseStaking \_19--loglevel=error
For example, if your Node ID is e737ec6efbd26ef43bf676911cdc5a11ba15fc6562d05413e6589fccdd6c06d5 and the software version is v1.2.3, the Docker command would be the following:
If you would like your node to sync from the start of the last network upgrade, then please see the instructions here
Alternatively, you can build a binary for the access node to run it without using Docker. To build the access node binary, see the instructions here. Please make sure to git checkout the latest release tag before building the binary.
- Mainnet
- Testnet
_18$PWD/flow-go/flow_access_node \_18--nodeid=e1a8b231156ab6f2a5c6f862c933baf5e5c2e7cf019b509c7c91f4ddb0a13398 \_18--bootstrapdir=$PWD/bootstrap \_18--datadir=$PWD/data/protocol \_18--secretsdir=$PWD/data/secrets \_18--execution-data-dir=$PWD/data/execution_data \_18--rpc-addr=0.0.0.0:9000 \_18--secure-rpc-addr=0.0.0.0:9001 \_18--http-addr=0.0.0.0:8000 \_18--rest-addr=0.0.0.0:8070 \_18--admin-addr=localhost:9002 \_18--bind=0.0.0.0:3569 \_18--dht-enabled=false \_18--grpc-compressor=gzip \_18--profiler-dir=$PWD/data/profiler \_18--dynamic-startup-access-address=secure.mainnet.nodes.onflow.org:9001 \_18--dynamic-startup-access-publickey=28a0d9edd0de3f15866dfe4aea1560c4504fe313fc6ca3f63a63e4f98d0e295144692a58ebe7f7894349198613f65b2d960abf99ec2625e247b1c78ba5bf2eae \_18--dynamic-startup-epoch-phase=EpochPhaseStaking
_18$PWD/flow-go/flow_access_node \_18--nodeid=e1a8b231156ab6f2a5c6f862c933baf5e5c2e7cf019b509c7c91f4ddb0a13398 \_18--bootstrapdir=$PWD/bootstrap \_18--datadir=$PWD/data/protocol \_18--secretsdir=$PWD/data/secrets \_18--execution-data-dir=$PWD/data/execution_data \_18--rpc-addr=0.0.0.0:9000 \_18--secure-rpc-addr=0.0.0.0:9001 \_18--http-addr=0.0.0.0:8000 \_18--rest-addr=0.0.0.0:8070 \_18--admin-addr=localhost:9002 \_18--bind=0.0.0.0:3569 \_18--dht-enabled=false \_18--grpc-compressor=gzip \_18--profiler-dir=$PWD/data/profiler \_18--dynamic-startup-access-address=secure.testnet.nodes.onflow.org:9001 \_18--dynamic-startup-access-publickey=ba69f7d2e82b9edf25b103c195cd371cf0cc047ef8884a9bbe331e62982d46daeebf836f7445a2ac16741013b192959d8ad26998aff12f2adc67a99e1eb2988d \_18--dynamic-startup-epoch-phase=EpochPhaseStaking
For a more mature setup, it is recommended that you run the container using systemd as described here
🚀 The access node should now be up and running, and you should be able to query the node using Flow CLI or curl,
Monitoring and Metrics
The node publishes several Prometheus metrics. See Monitoring Node Health to setup node monitoring.
Node Status
The metrics for the node should be able to provide a good overview of the status of the node. If we want to get a quick snapshot of the status of the node, and if it's properly participating in the network, you can check the consensus_compliance_finalized_height or consensus_compliance_sealed_height metric, and ensure that it is not zero and strictly increasing.
_10curl localhost:8080/metrics | grep consensus_compliance_sealed_height_10_10# HELP consensus_compliance_sealed_height the last sealed height_10# TYPE consensus_compliance_sealed_height gauge_10consensus_compliance_sealed_height 1.132054e+06
FAQs
Will the access node receive rewards?
No, the access nodes do not receive any rewards.
Why is there a 100 FLOW token minimum?
As mentioned in the FLIP, the minimum is required to prevent certain vulnerabilities in the smart contract that are a result of having a zero minimum stake requirement.
Can the Access node be unstaked?
Yes, like any other staked node, the Access node can be unstaked. The staked tokens will be moved to the unstaked bucket in the subsequent epoch.
How to see all the access nodes that have staked?
When the nodes are initially staked, they are all added to the candidate list of nodes before the end of the epoch staking phase. The list can be retrieved from the chain by executing the get_candidate_nodes script which returns the candidate list for the current epoch.
_10$ flow scripts execute ./transactions/idTableStaking/scripts/get_candidate_nodes.cdc -n mainnet
How to check the availability of open access nodes slots for the next epoch?
The limits for the open slots are defined in the staking contract and can be queried from the chain by executing the get_slot_limits script.
Node types are defined here
_10_10$ flow scripts execute ./transactions/idTableStaking/scripts/get_slot_limits.cdc --args-json '[{ "type":"UInt8", "value":"5"}]' -n mainnet_10Result: 118
Example: there are 115 access nodes already part of the network. Hence, the total number of new nodes that can join are 118 - 115 = 3.